Usage Limits
The Usage Limits feature helps you control AI consumption and spending across your organization. You can set spending limits, monitor rate limits, and configure alerts to stay informed about your usage.
Overview
Navigate to Settings > Usage Limits to access the usage management interface. The page is organized into two main tabs:
- Organization Limits: Configure usage limits, view rate limits, and set up alerts for your entire organization
- Scoped Limits: Apply specific limits to individual users, groups, custom identifiers, or all users in the organization
Organization Limits
The Organization Limits tab provides a comprehensive view of your organization's AI usage and allows you to configure controls across the entire organization.
Access Roles
Access to Usage Limits is determined by your assigned role:
- Tenant Administrator: Full access to organization-wide and scoped limit management
- Usage Limit Administrator: Manage limits for the entire organization
- Scoped Usage Limit Administrator: Manage scoped limits for users, groups, and custom identifiers
If you do not have one of these roles, you will not be able to view or manage usage limits.
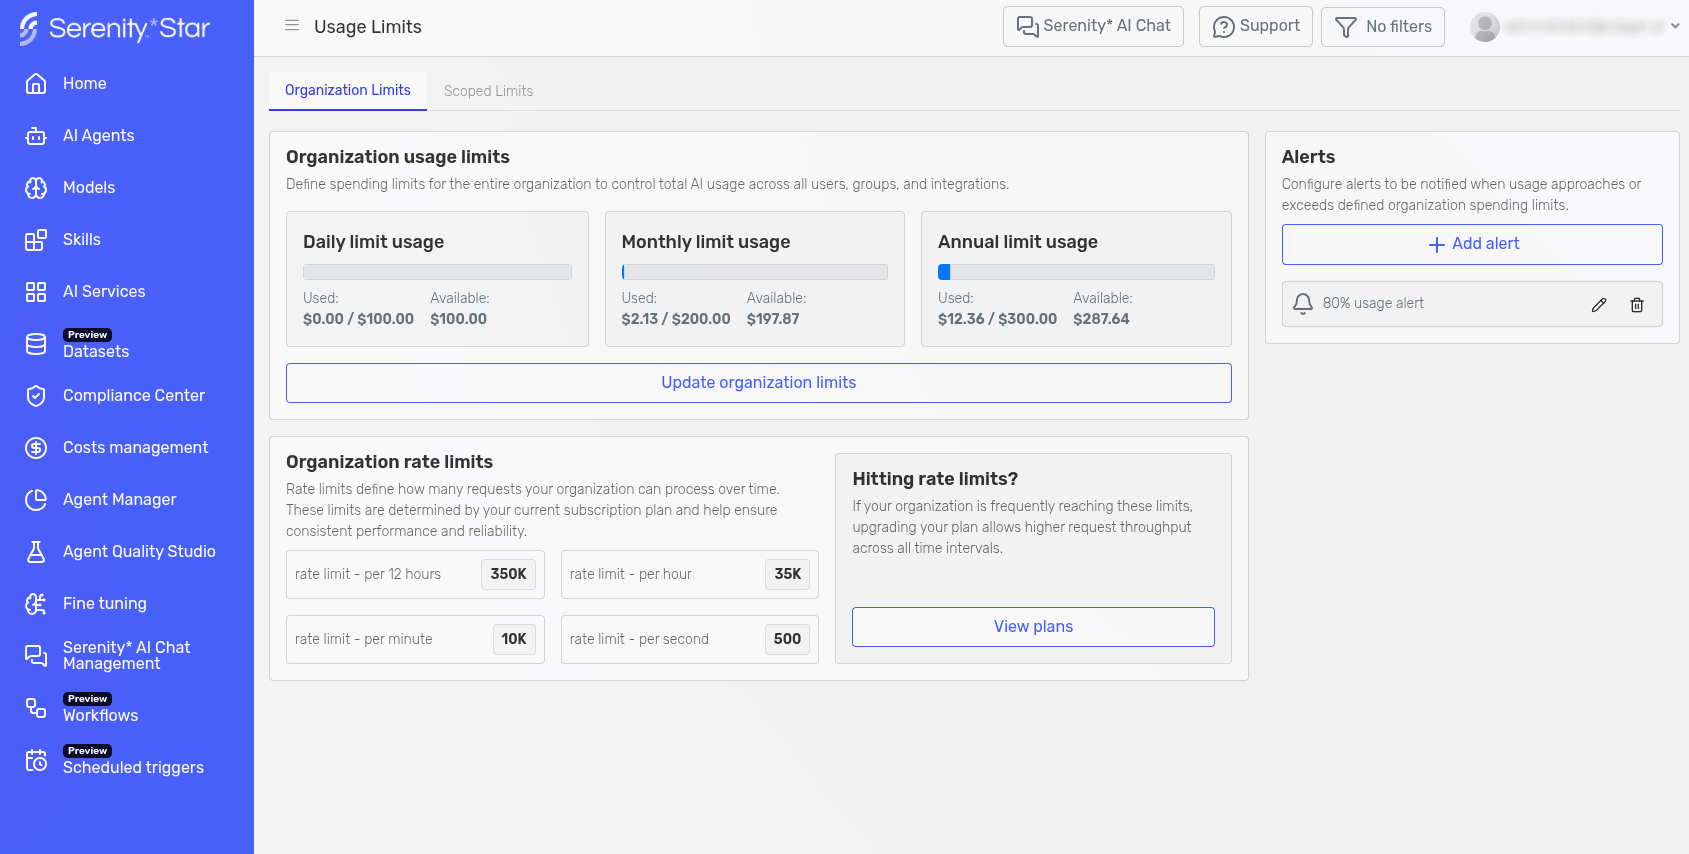
Organization Usage Limits
Define spending caps for your organization across different time periods (Daily, Monthly, and Annual) to control costs and prevent unexpected charges.
At the top of the page, three cards display your current usage versus available credit for each period. Click Update organization limits to configure restrictions.
Important:
- Daily limits cannot exceed monthly or annual limits
- Monthly limits cannot exceed annual limits
- All limits are in your organization's currency
- At least one limit is recommended
Default: New organizations start with a €0.50 per day restriction until a custom plan is configured.
Organization Rate Limits
Rate limits define how many AI requests your organization can process over time. These limits are determined by your current subscription plan and help ensure consistent performance and reliability.
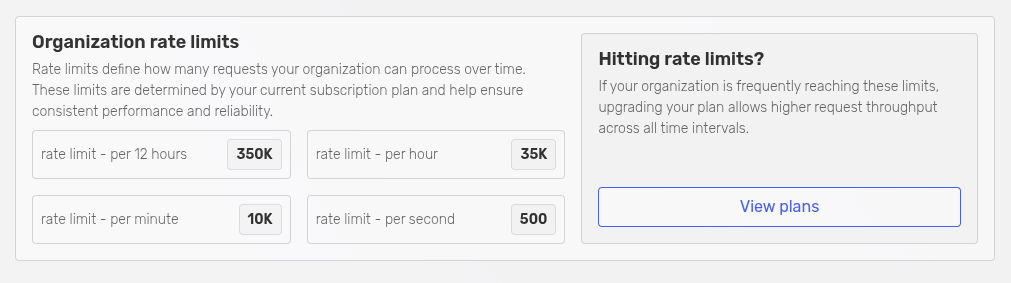
The Organization Rate Limits section displays the following information:
- Rate limit - per 12 hours: Maximum number of requests allowed in a 12-hour period
- Rate limit - per hour: Maximum number of requests allowed per hour
- Rate limit - per minute: Maximum number of requests allowed per minute
- Rate limit - per second: Maximum number of requests allowed per second
These limits are read-only and are automatically configured based on your subscription plan.
Hitting Rate Limits?
If your organization is frequently reaching these limits, you may need to upgrade your plan for higher request throughput. Click View plans to explore plan options with higher rate limits.
Alerts
The Alerts feature allows you to set up email notifications when your usage reaches specific thresholds. This helps you stay informed and take action before hitting your limits.
Setting Up Alerts
- In the Alerts panel on the right side of the page, click Add alert
- Configure the alert parameters:
- Alert when usage exceeds: Enter a percentage (e.g., 80 to be alerted at 80% of your limit)
- Email subject (optional): Customize the subject line of the alert email
- Also send alerts to: Add additional email addresses to receive alerts beyond tenant administrators
- Click Save to create the alert
Managing Alerts
- All configured alerts are displayed in the Alerts panel
- You can edit or delete existing alerts at any time
- Multiple alerts can be configured for different thresholds (e.g., 50%, 80%, 90%)
- Alerts are sent to tenant administrators by default, plus any additional email addresses you specify
When an alert is triggered, the specified recipients will receive an email notification informing them that usage has exceeded the configured threshold.
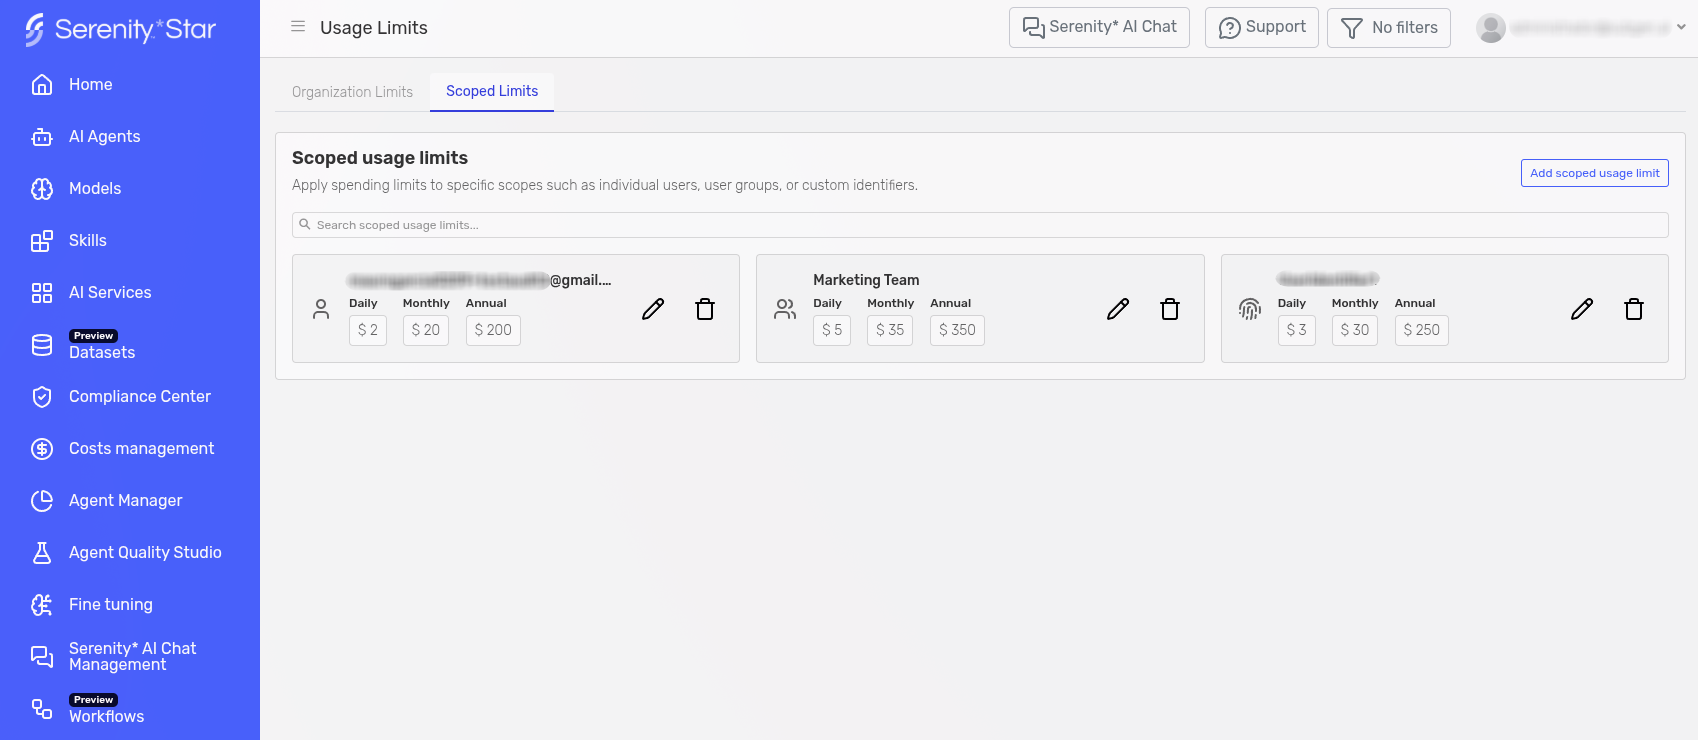
Scoped Limits
The Scoped Limits tab allows you to apply granular spending limits to specific users, groups, or custom user identifiers. This provides fine-grained control over AI usage at a more detailed level than organization-wide limits.
Overview
Scoped usage limits enable you to:
- Set different spending limits for individual users or teams
- Apply limits to user groups for team-level control
- Use custom user identifiers for advanced integrations
- Control spending for all users in the organization with a single scoped limit
All scoped limits work within the boundaries of your organization limits. Users cannot exceed the organization limits even if their scoped limits allow for higher spending.
Access Requirements
To manage scoped limits, you need one of the following roles:
- Tenant Administrator: Full access to create, edit, and delete scoped limits
- Scoped Usage Limit Administrator: Manage scoped limits for users and groups
Viewing Scoped Limits
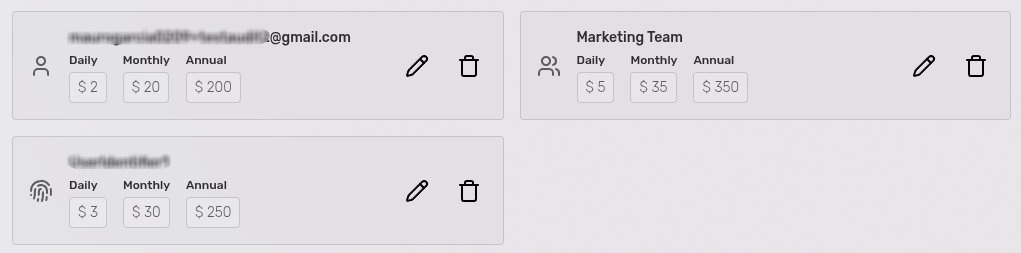
The Scoped Limits tab displays all configured scoped limits in a searchable grid. Each limit card shows:
- The scope type icon (user, group, or custom identifier)
- The scope name or identifier
- Daily, Monthly, and Annual limits
- Edit and delete actions
Use the search bar at the top to quickly find specific scoped limits by entering user names, group names, or identifiers.
Creating a Scoped Limit
To create a new scoped limit:
- Click Add scoped usage limit in the top right corner
- Follow the multi-step configuration process
Step 1: Select Scope Type
Choose the type of scope to which this limit will apply:
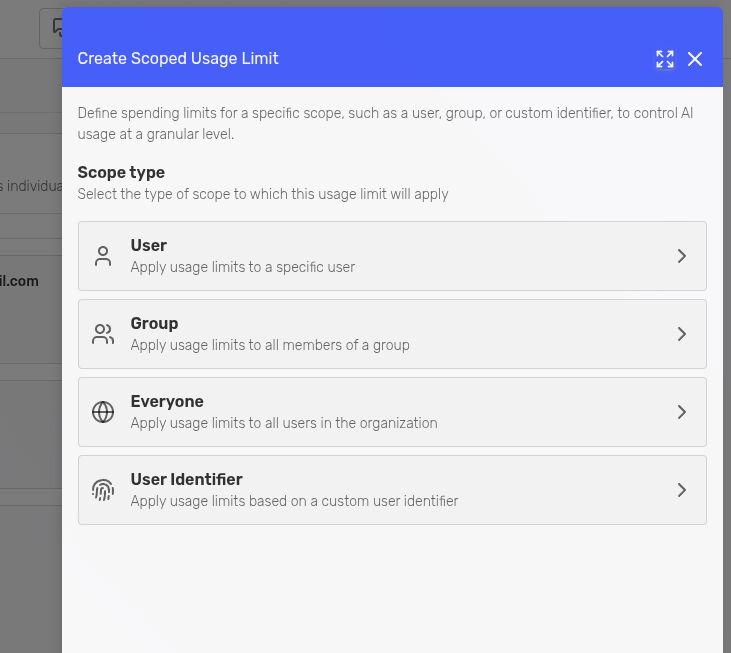
- User: Apply usage limits to a specific user
- Group: Apply usage limits to all members of a group
- Everyone: Apply usage limits to all users in the organization
- User Identifier: Apply usage limits based on a custom user identifier
Step 2: Select Scope Target
Based on your scope type selection, you'll be prompted to specify the target:
- User: Select a specific user from a dropdown list
- Group: Select a specific group from a dropdown list
- Everyone: No target selection needed (this step is skipped)
- User Identifier: Enter a custom identifier in the text field
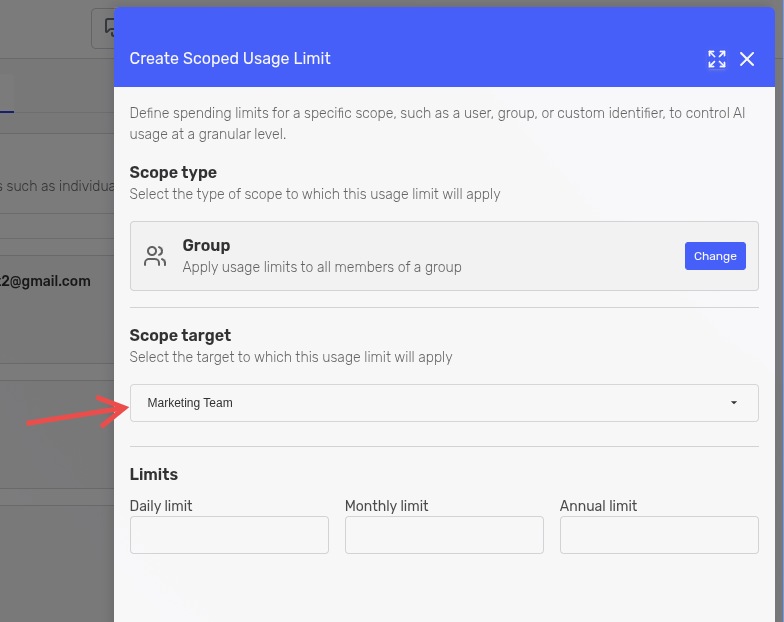
Step 3: Define Limits
Configure the spending limits for the selected scope:
- Daily limit: Maximum spending allowed per day
- Monthly limit: Maximum spending allowed per month
- Annual limit: Maximum spending allowed per year
Important constraints:
- The monthly limit cannot exceed the annual limit
- The daily limit cannot exceed either the monthly or annual limit
- All limits are configured in your organization's currency
- None of the limits are required, but at least one is recommended
Click Create to save the scoped limit.
Limit Precedence
When multiple scoped limits apply to a user, the system follows this precedence order (from most specific to least specific):
- User-specific limit: If a limit is set directly for the user, this takes precedence
- Group limit: If the user belongs to a group with a limit, this applies
- Everyone limit: If an "Everyone" scoped limit exists
Example:
Sarah is a member of the "Marketing Team" group, which has a daily limit of $10. Sarah also has a personal limit of $5 per day. In this case, Sarah's personal limit of $5 takes precedence because it is more specific than the group limit.
Note: User identifier limits work independently and apply based on custom identifiers rather than user or group membership. Organization limits apply to the total spending across the entire organization, not to individual users.
Managing Scoped Limits
You can edit or delete scoped limits directly from the grid using the edit (pencil) and delete (trash can) icons.
Note: You cannot change the scope type or target when editing. To apply limits to a different scope, delete the current limit and create a new one. When a scoped limit is deleted, users affected by that limit will fall back to the next applicable limit in the precedence order.
Best Practices
- Start broad, then refine: Begin with organization limits and add scoped limits only where specific control is needed
- Use groups for teams: Apply limits to groups rather than individual users when managing teams
- Monitor usage regularly: Review scoped limits periodically to ensure they align with your needs
- Set up alerts: Configure alerts to be notified when users or groups approach their limits
- Document custom identifiers: If using user identifiers, maintain documentation of what each identifier represents