Knowledge
Introduction
The Knowledge module enhances agents by integrating information from external sources, such as product catalogs, research reports, user manuals, and documents provided by your users. Serenity* Star automatically analyzes and segments these documents, creates and stores embeddings, and uses vector search to retrieve relevant content to answer user queries.
You can add knowledge to your agent using two distinct sources: files and websites. Whether you are incorporating detailed documents or specific online content, Serenity* Star processes these sources to enrich your agent's ability to provide accurate and contextually relevant responses.
How to Use
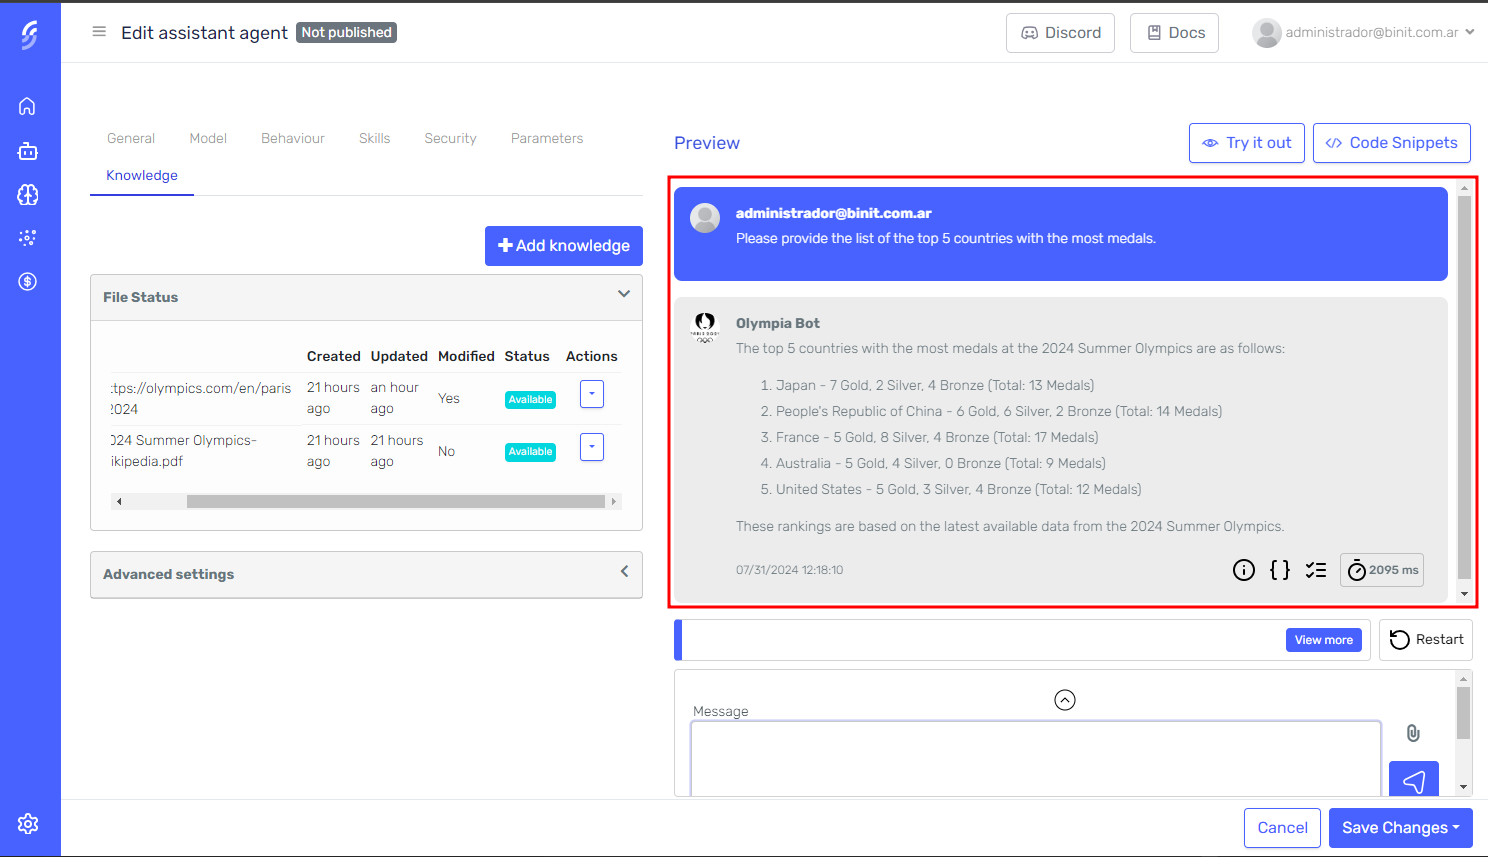
In this example, we'll enhance an existing Assistant Agent with knowledge so that it can effectively answer questions about the 2024 Olympic Games. If you need guidance on creating an Assistant Agent, refer to this guide.
Add Knowledge
-
Navigate to the Knowledge tab.

-
Click the "Add Knowledge" button.
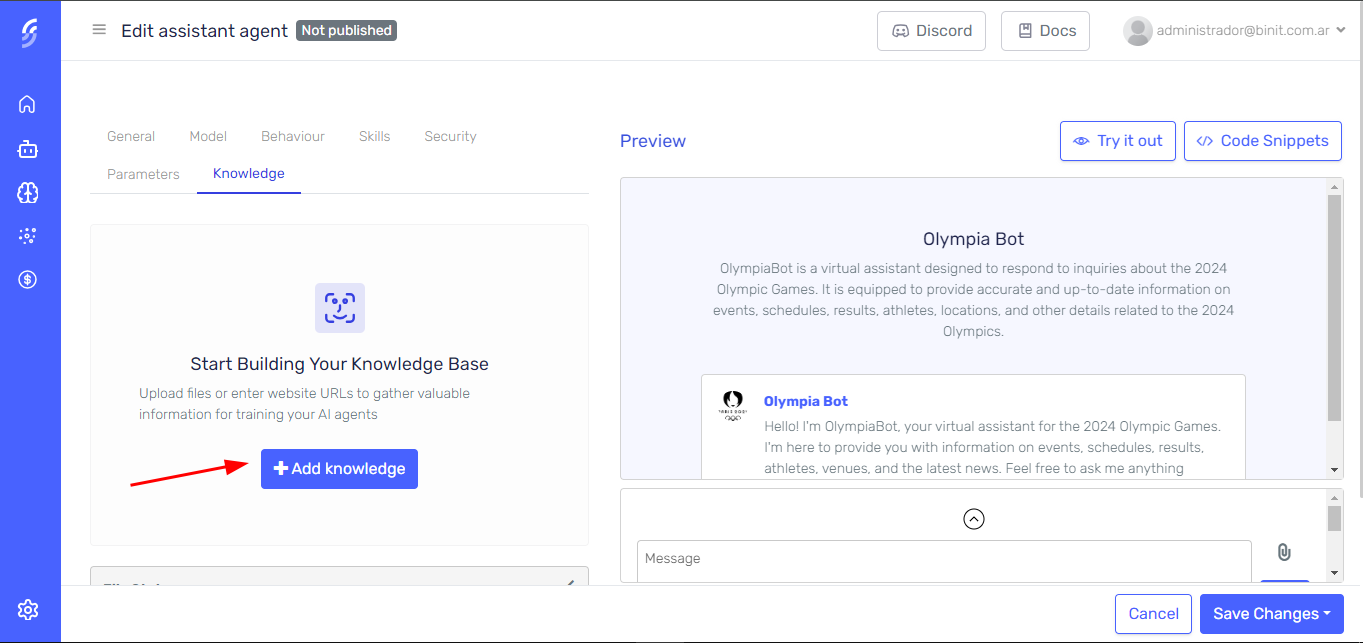
-
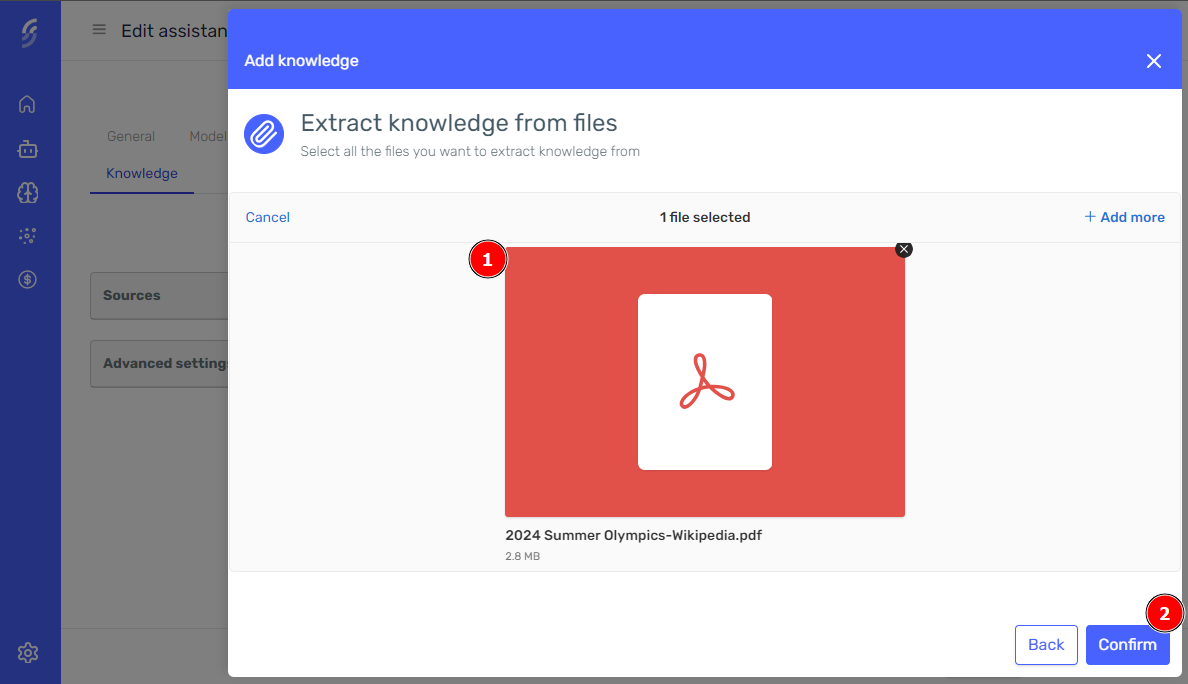
Select your knowledge source. You can choose Websites or Files.
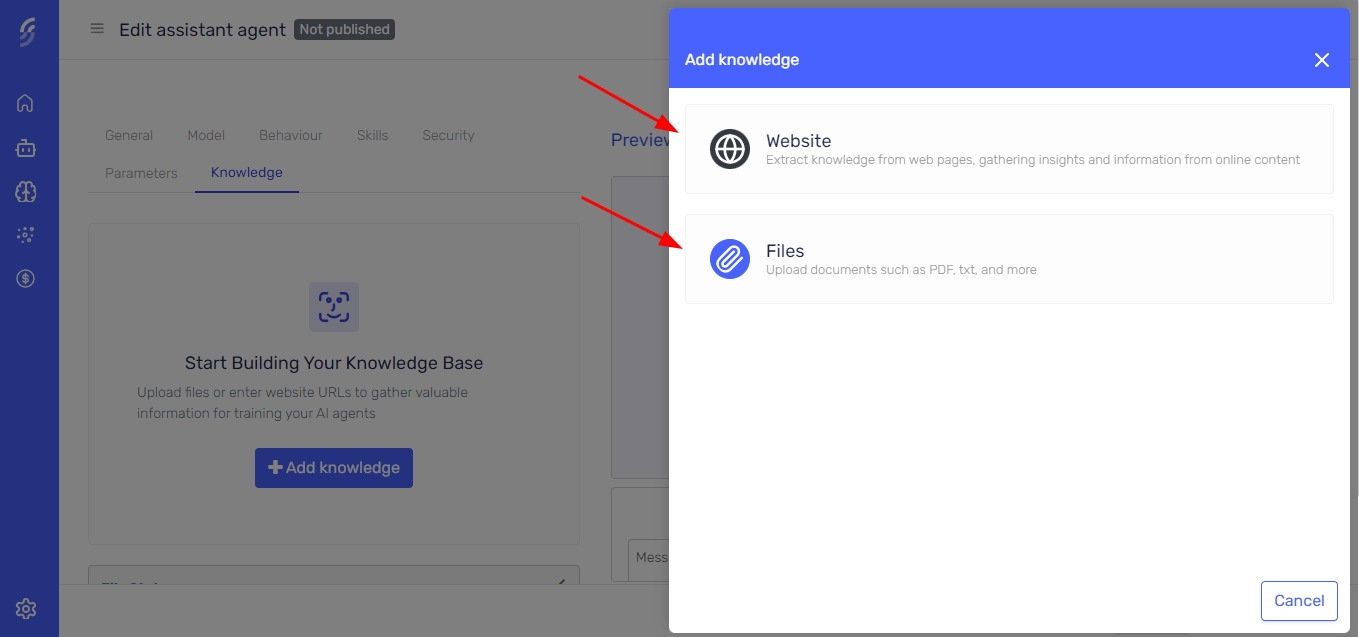
Using Websites as Knowledge Source
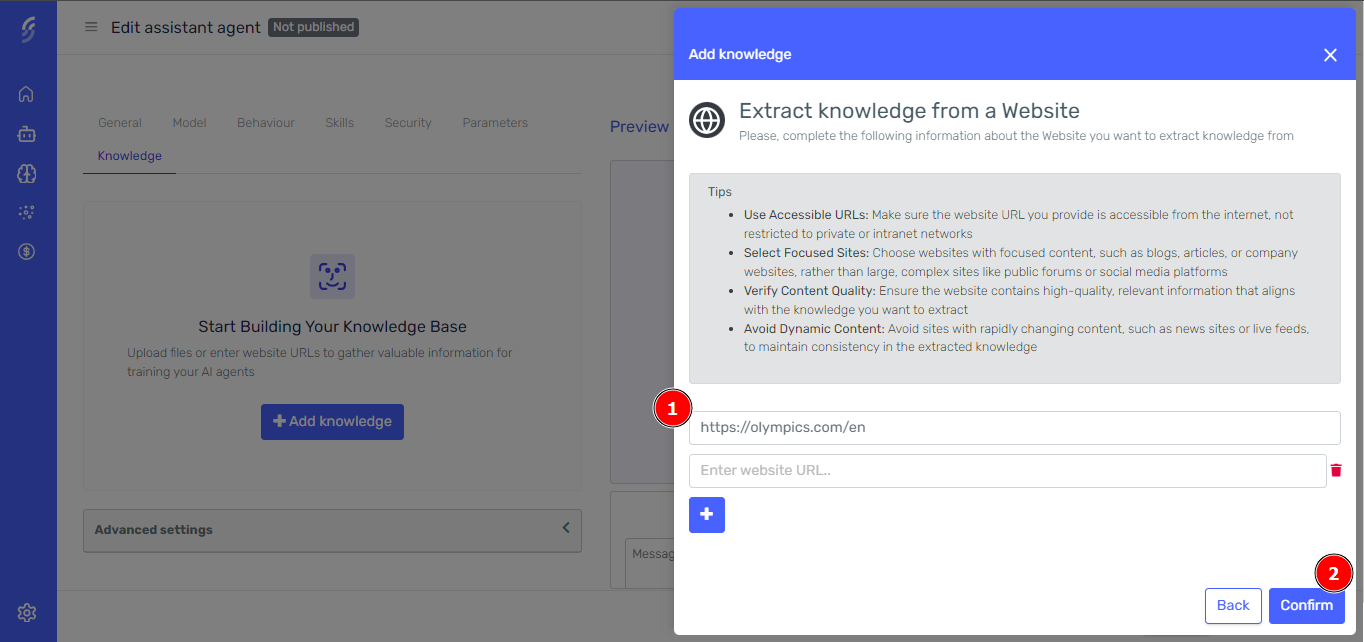
To use websites as a knowledge source, press the "Add Knowledge" button in the Knowledge tab and select the Websites option. If you need further guidance, follow these instructions described above.
From this section, you can add one or multiple URLs at once. After adding the URLs, click the confirm button.
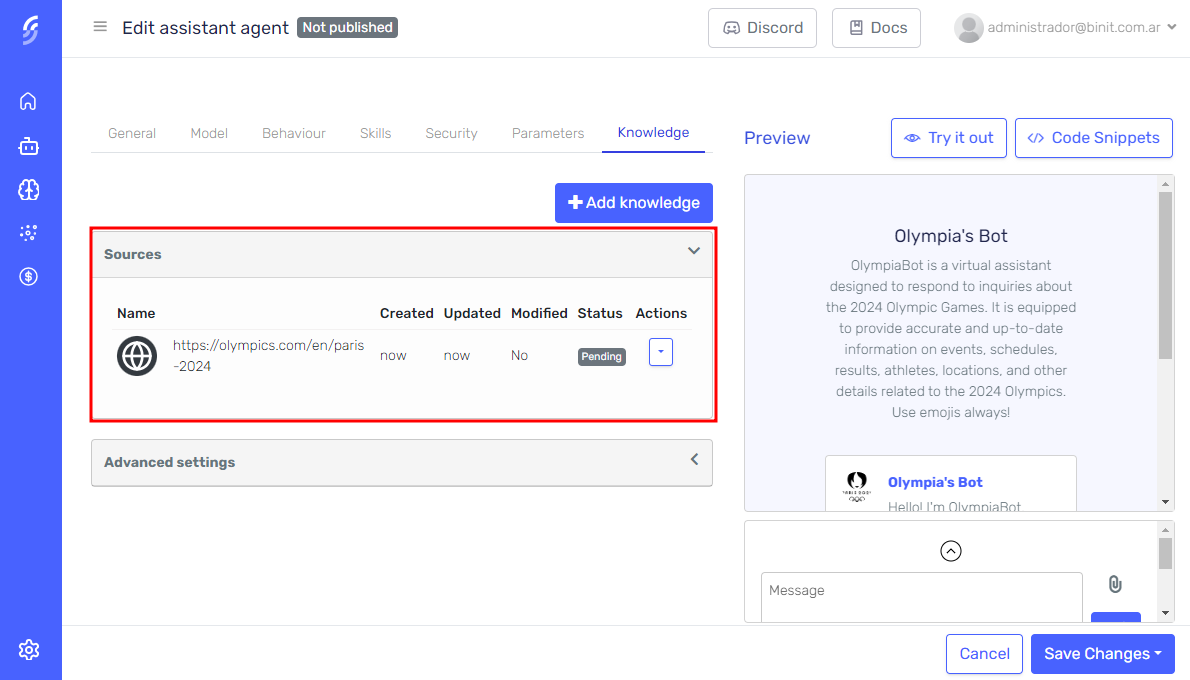
In a few moments, the websites will appear in the grid and start processing. Just wait a few seconds for the processing to finish, and the new knowledge will be available for the agent.
File Downloading
When a website is processed, any downloadable files found will be automatically retrieved and added as new knowledge sources. This ensures that all relevant content, including PDFs, documents, and other downloadable resources, is incorporated into the agent's knowledge base, enhancing the quality of its responses.
Tips
- Use Accessible URLs: Make sure the website URL you provide is accessible from the internet, not restricted to private or intranet networks
- Select Focused Sites: Choose websites with focused content, such as blogs, articles, or company websites, rather than large, complex sites like public forums or social media platforms
- Verify Content Quality: Ensure the website contains high-quality, relevant information that aligns with the knowledge you want to extract
- Avoid Dynamic Content: Avoid sites with rapidly changing content, such as news sites or live feeds, to maintain consistency in the extracted knowledge
Using Files as Knowledge Source
To use files as a knowledge source, press the "Add Knowledge" button in the Knowledge tab and select the Files option. If you need further guidance, follow these instructions described above.
From this section, you can upload one or multiple files at once. After uploading the files, click the confirm button.
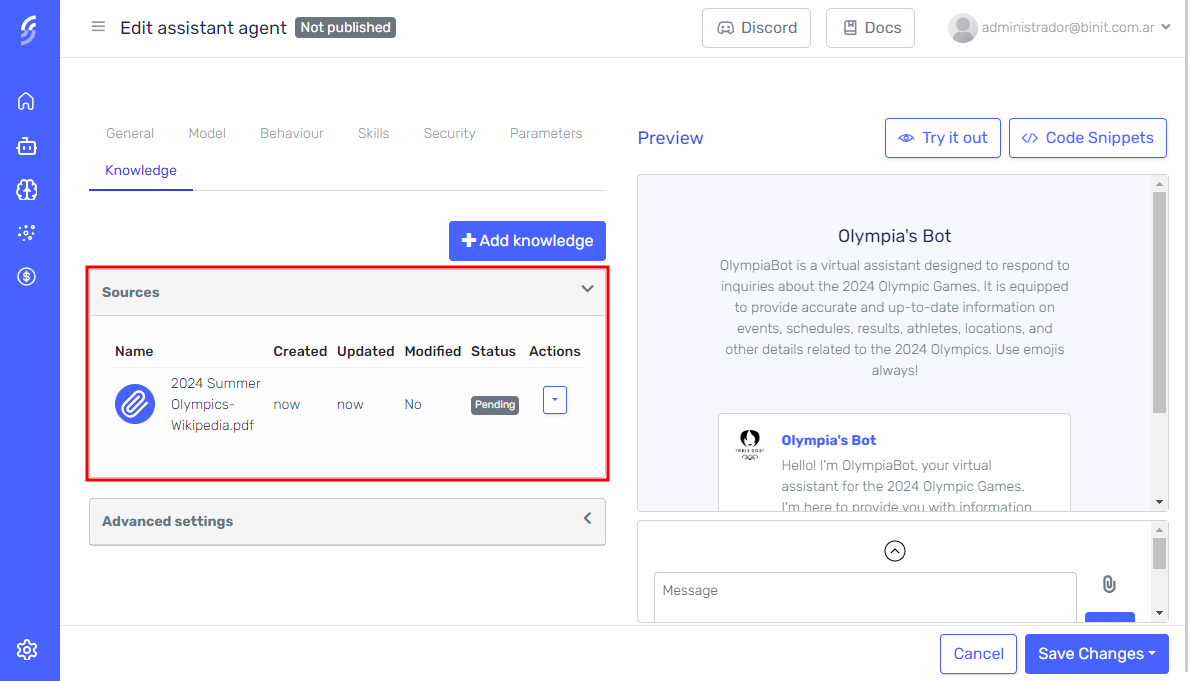
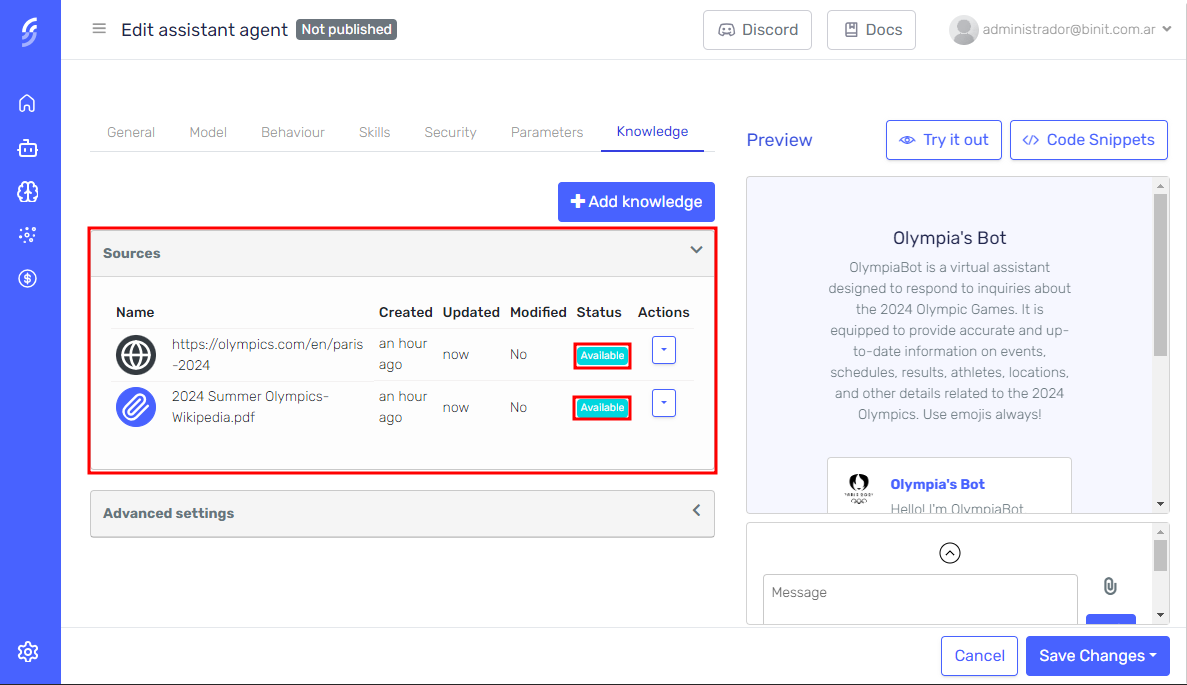
In a few moments, the files will appear in the grid and start processing. Just wait a few seconds for the processing to complete, and the new knowledge will be available for the agent.
When you upload CSV files, Serenity* Star automatically creates a "Default Dataset" for your agent. Each CSV becomes a queryable database table that your agent can filter, search, and perform calculations on.
For more details, see the Datasets documentation.
Your CSV file must:
- Have column headers in the first row
- Use consistent data types within each column
- Use UTF-8 encoding
- Have a consistent column count across all rows
Wait for Processing
After you have uploaded files or added URLs and saved the changes, Serenity* Star will automatically begin processing the data. The processing involves the following steps:
- 🔍 Extract content.
- 📂 Files: Scanning the content of the uploaded files.
- 🌐 Websites: Scraping the content from the provided URLs.
- ✂️ Segment the content into sections.
- ⚙️ Generate the embeddings.
You can track the status of each knowledge source from the "File Status" grid in the Knowledge tab. Once processing is complete, the status will change to Available, indicating that the knowledge is ready for the agent to use.
Sections
A "section" is a discrete part of content extracted from a knowledge source. Segmenting content into smaller sections is crucial for optimizing token usage, as it helps the agent stay within token limits while maintaining response accuracy. When a knowledge source is processed, Serenity* Star automatically divides it into sections based on content structure, such as paragraphs or logical groupings. This enables the agent to find and use the most relevant information, delivering precise, contextually accurate answers while making efficient use of resources.
Custom Segmentation
The Custom Segmentation feature allows you to define how content is divided into sections, offering greater flexibility in how knowledge is processed from file sources. By using a custom delimiter, you can control the segmentation of the content into more meaningful and contextually relevant chunks. To use this feature, insert the following delimiter in the content where you want to define the boundaries of each section:
%%%%%%%----////////\\\\----%%%%%%%
This delimiter indicates where Serenity* Star should break the content into sections. It’s especially useful for long or complex documents where the default segmentation may not be sufficient. Place the delimiter at logical points in the text, such as between topics or sections, to help the agent process the knowledge effectively. Custom segmentation ensures that the extracted knowledge is relevant and precise, improving the agent’s ability to deliver accurate information.
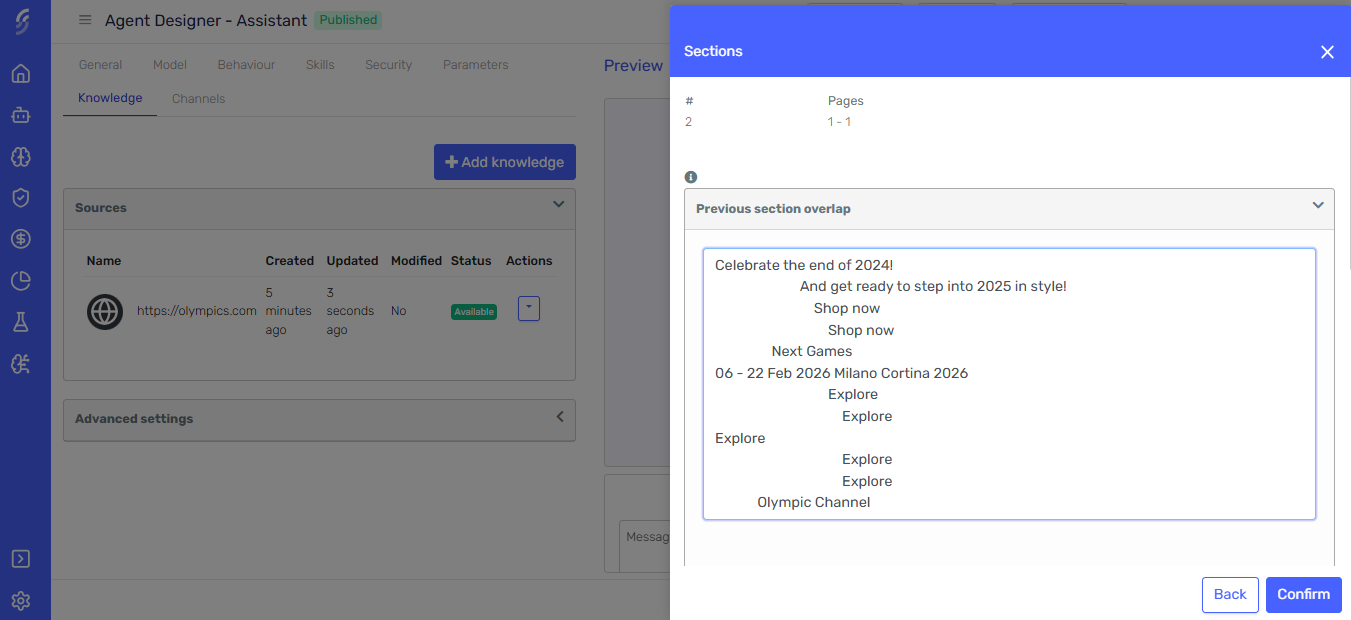
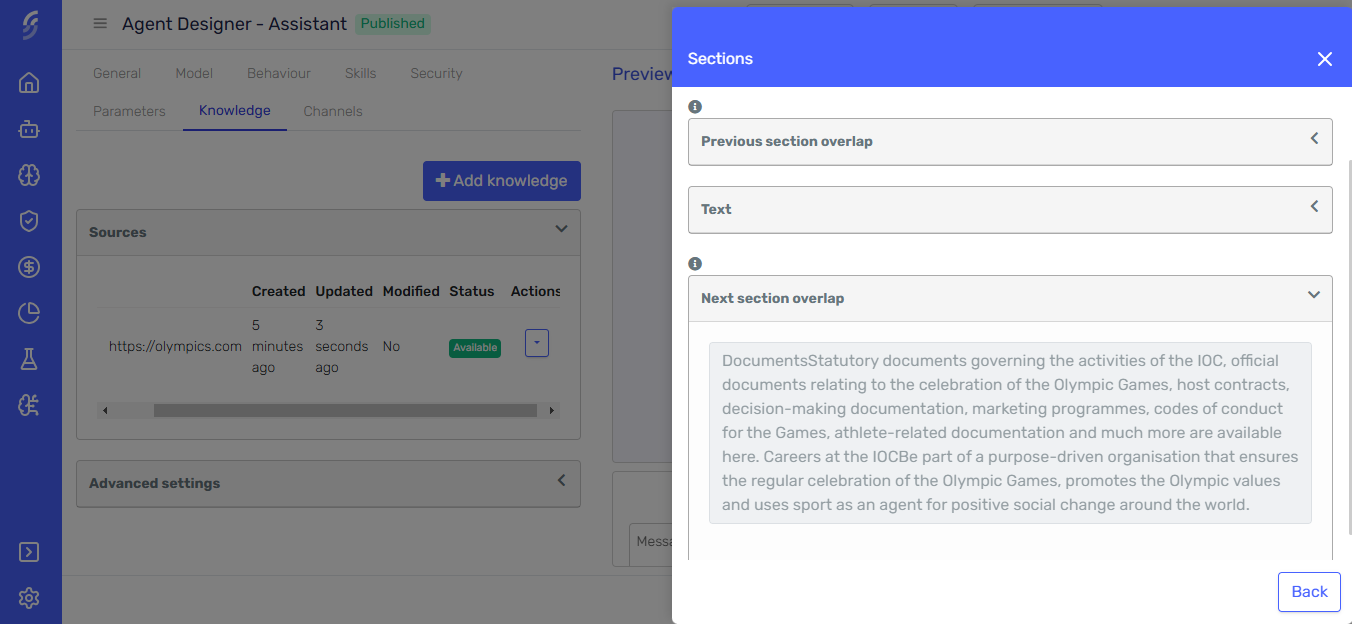
Text Overlap
The Text Overlap feature allows you to define how much content is shared between adjacent sections, improving the accuracy and relevance of the information retrieved by the agent. This is achieved by including overlapping content at the boundaries of each section, ensuring that no important context is lost during segmentation.
Text overlap is divided into three parts:
- Pre-text: Content that appears before the section, providing context from the previous section.
- Text: The core content of the section, representing the primary information.
- Post-text: Content that appears after the section, offering context for the following section.
By including pre-text and post-text in each section, you ensure that each segment retains enough context to maintain the flow and coherence of the knowledge, which helps the agent deliver more accurate and contextually relevant answers.
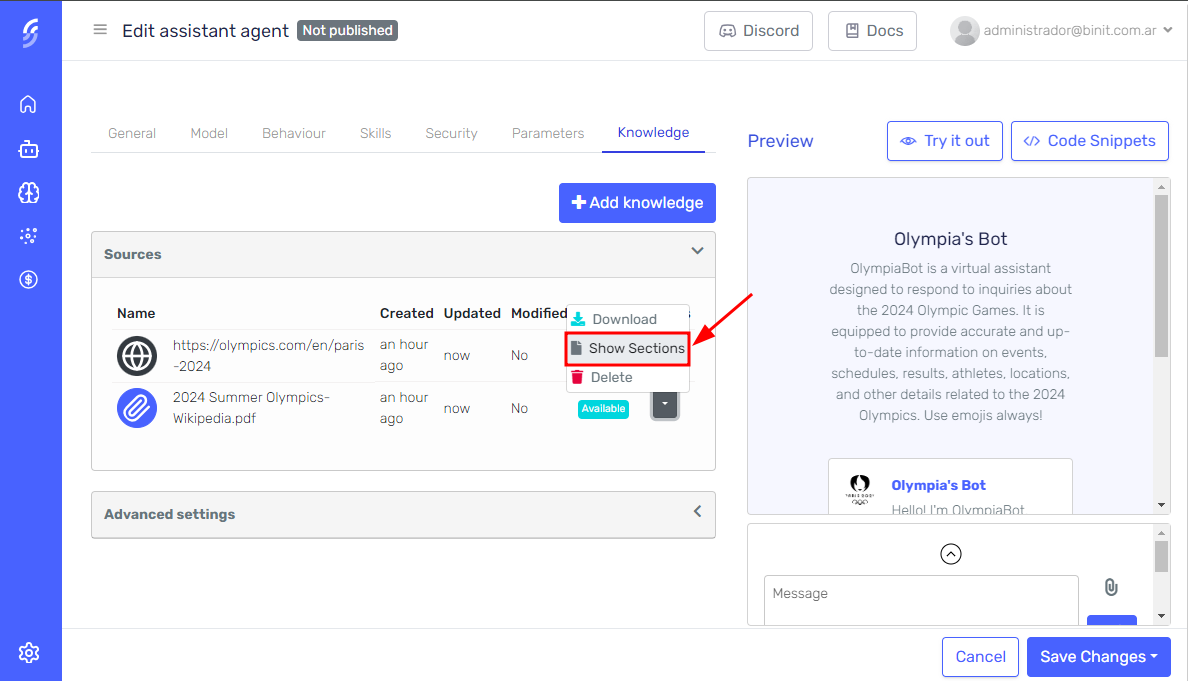
Manage Sections
Once the knowledge source has been successfully processed and is in the Available state, the "Show Sections" button will become visible. You can use this feature to view, edit, or delete specific sections of your knowledge source to correct or remove any unnecessary information.
In the section editor, you can modify not only the core content of each section (text) but also the pre-text and post-text surrounding each section. This allows you to fine-tune the context and relevance of the knowledge, ensuring the agent retrieves the most accurate and contextually relevant information.
Click the "Show Sections" button on the row to access the knowledge editor.
In the editor, all sections of the knowledge source will be listed, allowing you to view, delete, or modify them.
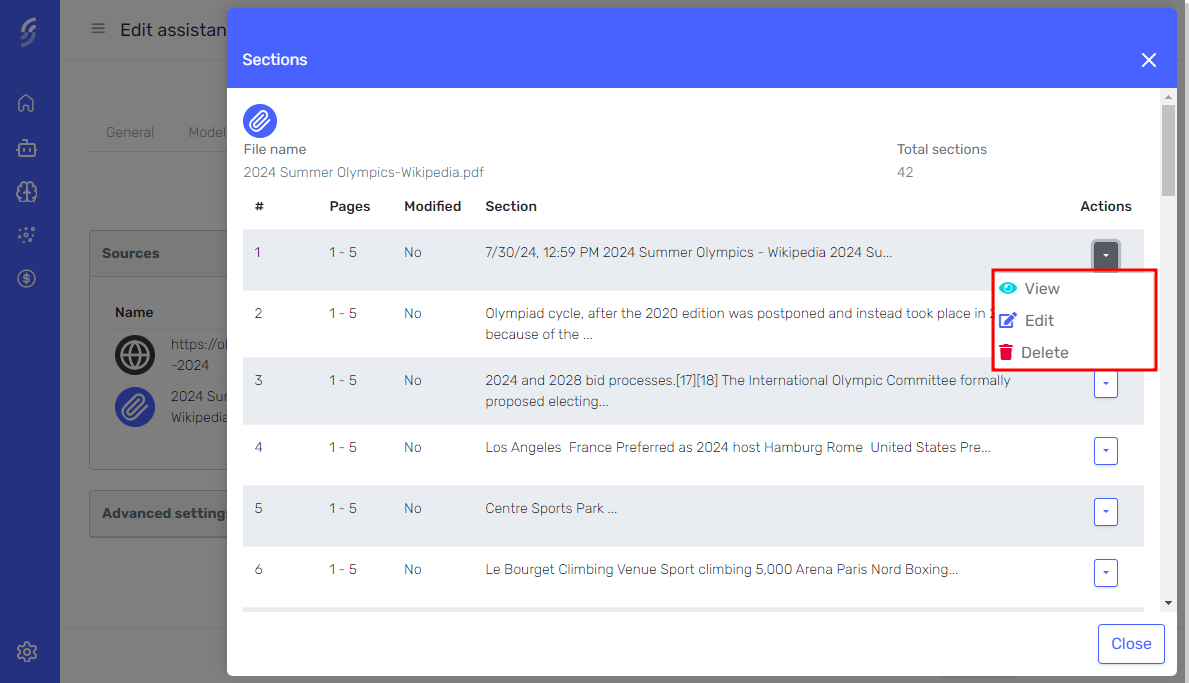
You can visualize and edit the pre-text, text, and post-text overlaps between adjacent sections.
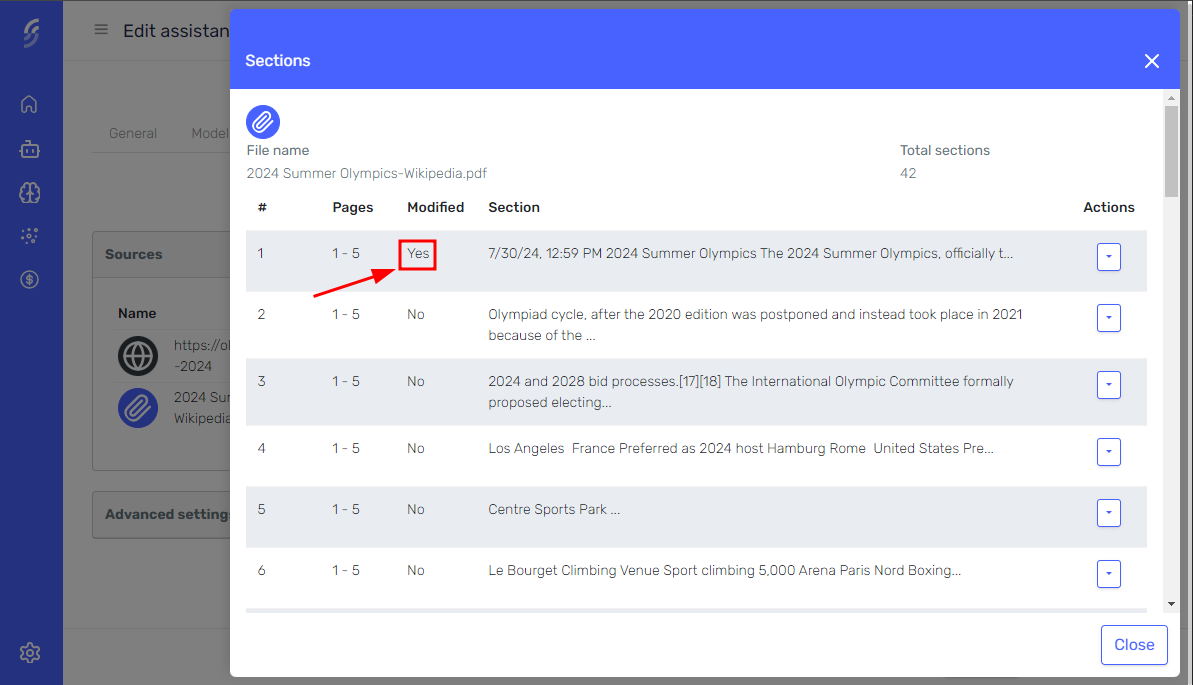
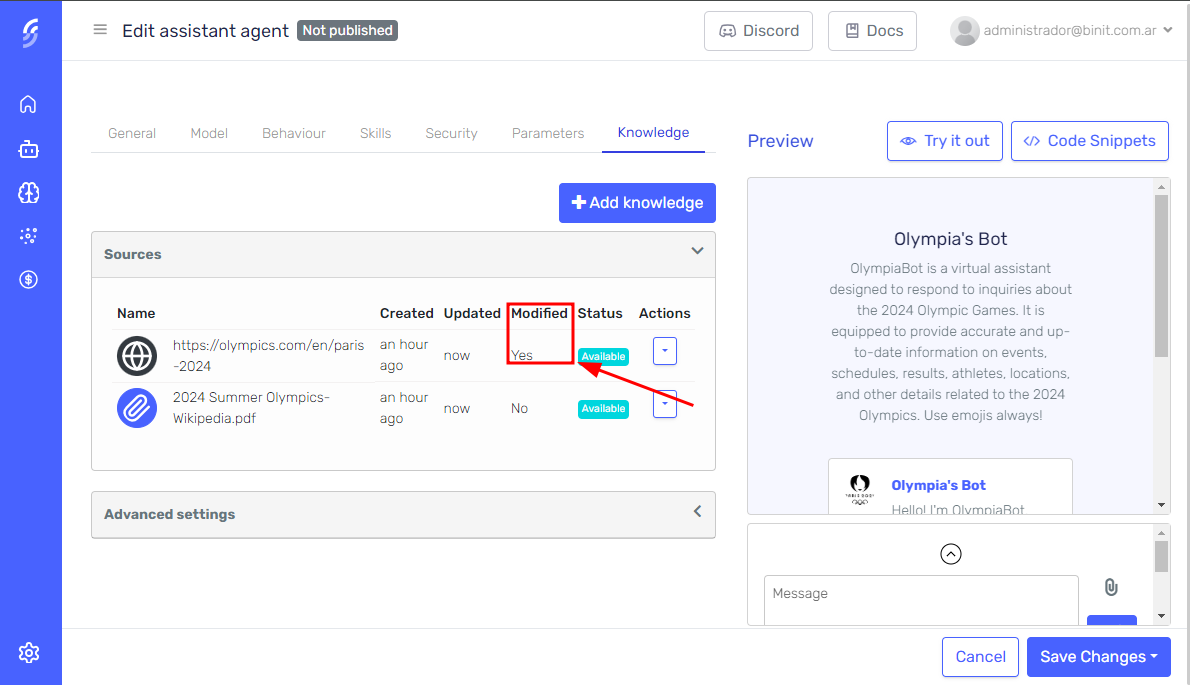
Any sections you modify, as well as the knowledge source they belong to, will be flagged to track changes.
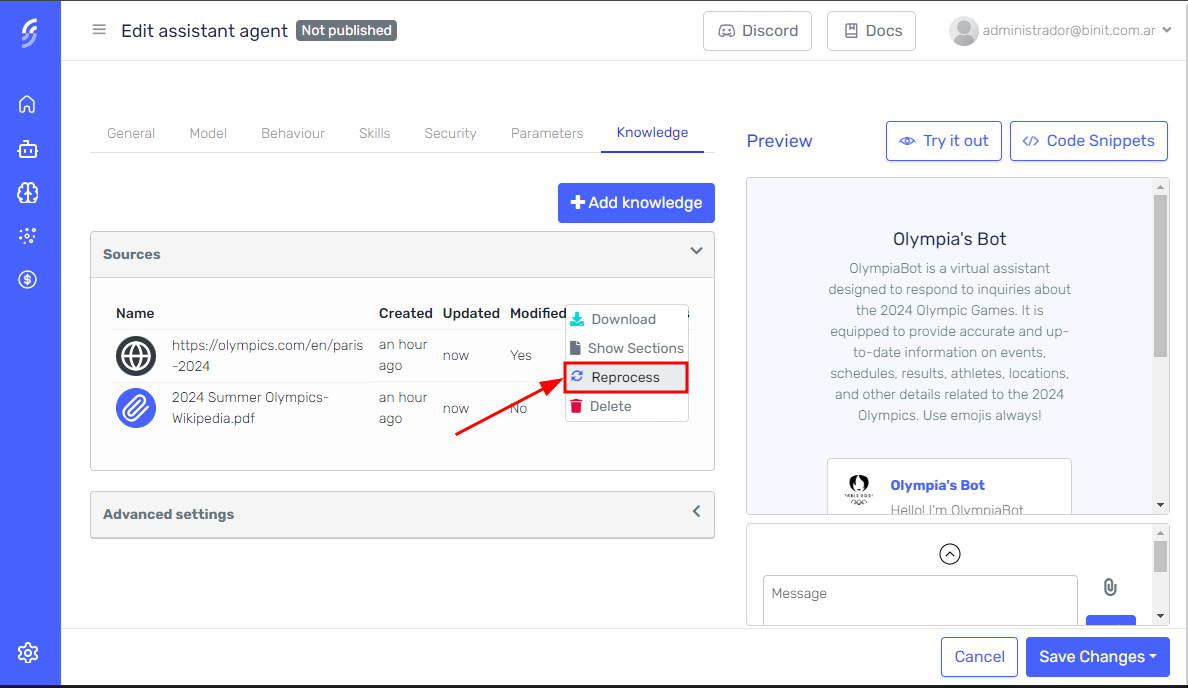
Reprocess
If a website you've added as a knowledge source has been updated and you want these changes to be reflected in the agent’s responses, or if you’ve made modifications to the sections of a website or file and wish to restore the original content, you can reprocess the knowledge source.
You can reprocess a knowledge source in two ways:
- Immediate Reprocessing: For websites and modified files, you can reprocess the knowledge source right away.
- Scheduled Reprocessing: You can schedule periodic reprocessing for websites, ensuring that the knowledge stays up-to-date automatically without manual intervention.
The reprocess button will only be visible when the knowledge source meets one of the following conditions:
- It's a website and it's currently in the available state.
- It's a file and it's sections have been modified.
- It's a website or file and it's currently in the error state.
To reprocess a knowledge source, click the dropdown button next to the file or website you wish to reprocess. From the dropdown menu, select the "Reprocess" option. This will prompt you to confirm the reprocessing.
Configure Reprocessing
You can configure the automatic reprocessing of websites to ensure that the agent's knowledge stays up-to-date. To do this:
-
Select the website from the list of knowledge sources.
-
Click on the Configure reprocessing button next to the website.
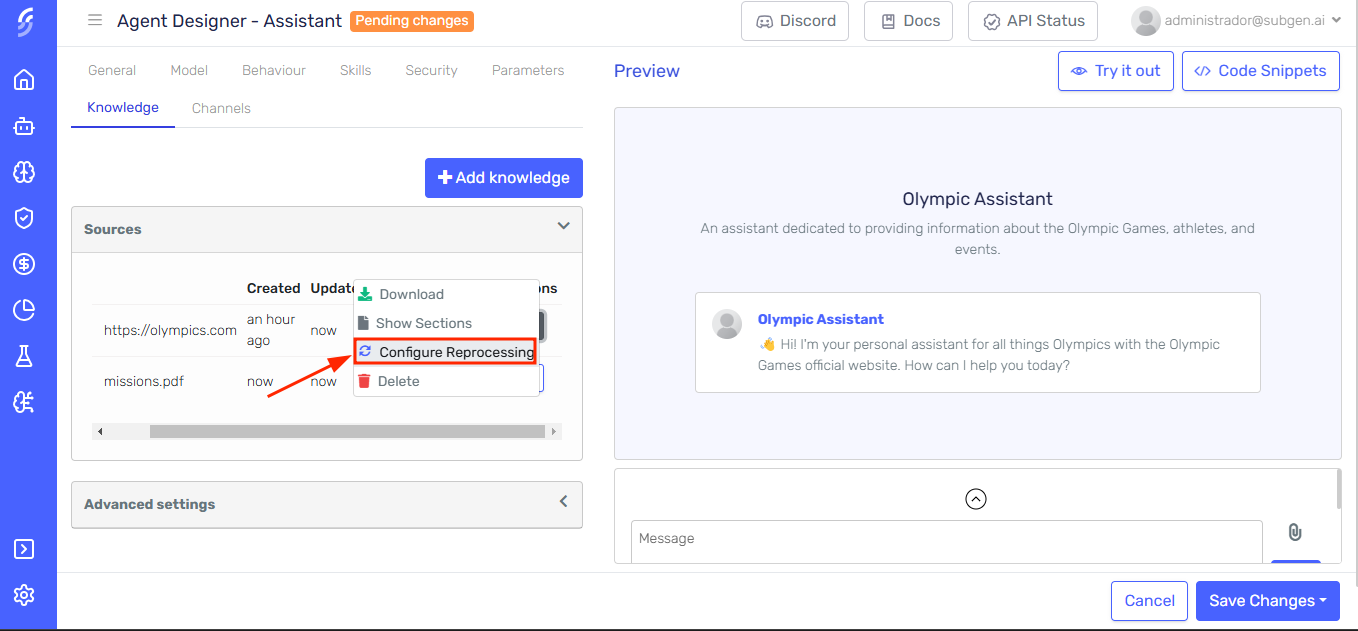
-
In the reprocess sidepanel, click the option Schedule Reprocessing.

-
Configure the reprocessing
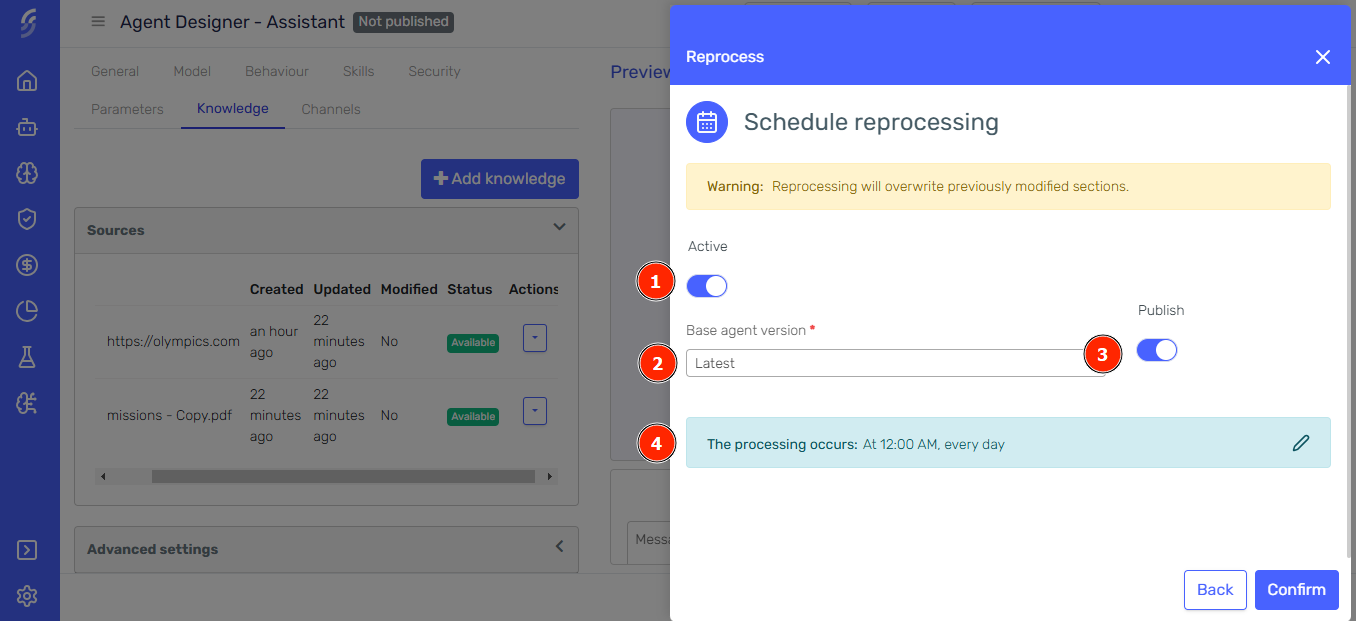
(1) Active: Toggle whether the scheduled reprocessing is active or inactive.
(2) Base Agent Version: Choose the agent version that will serve as the basis for generating a new version with the reprocessed website content.
(3) Publish: Decide whether the newly generated agent version should be published immediately.
(4) Frequency: Set the frequency for reprocessing the website
-
Add the desired frequency for reprocessing (e.g., daily, weekly, or monthly).
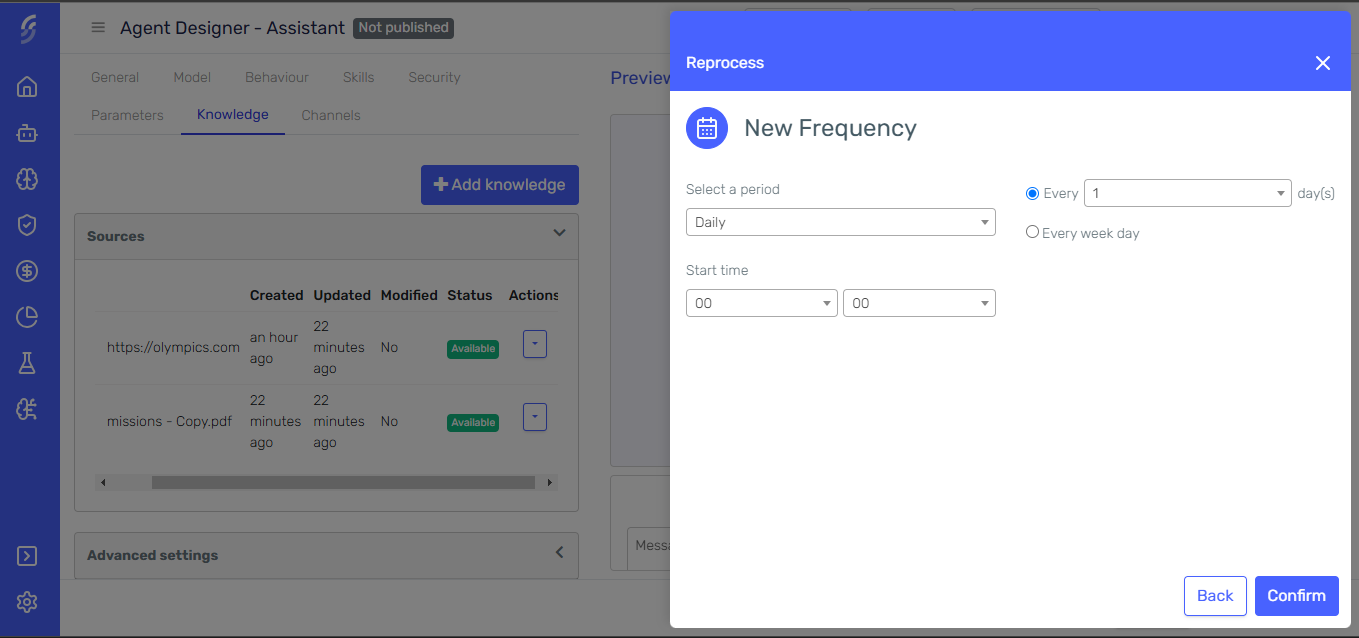
-
Save your schedule reprocess configuration.
This will schedule the reprocessing of the selected website at regular intervals, ensuring that the agent always has access to the most current content without manual intervention.
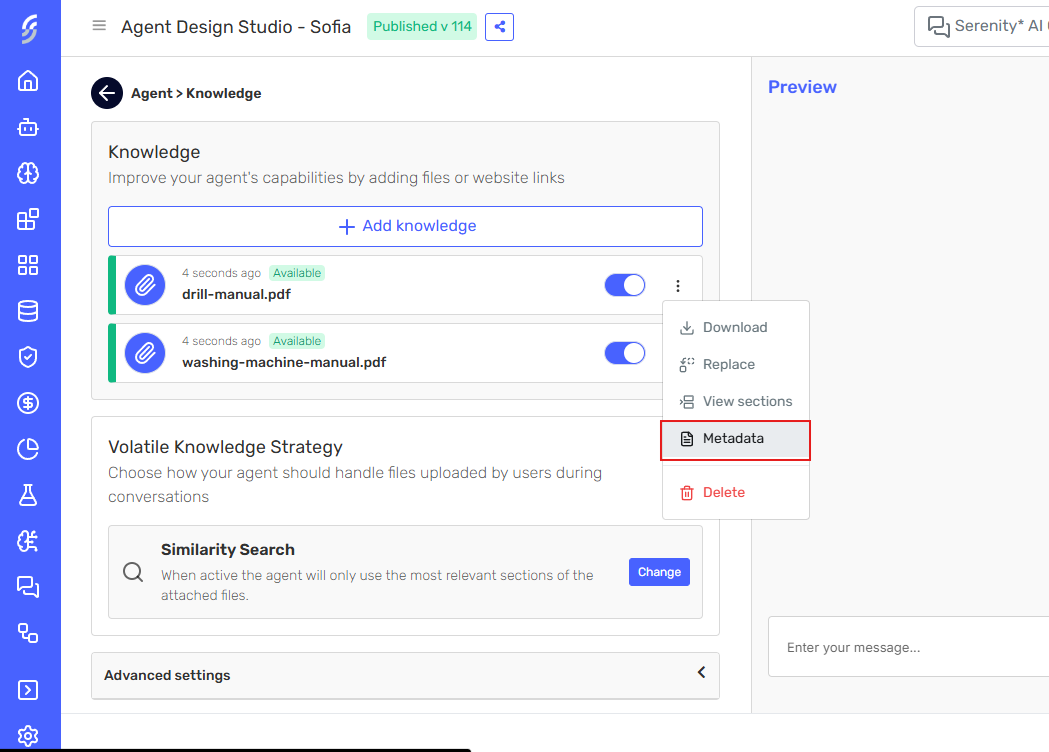
Manage Metadata
Each knowledge source can have a description and tags assigned to it. The description provides context about what a source contains, and tags enable targeted filtering. Depending on the Knowledge Integration Mode configured for the agent, this metadata can help it reason more accurately about which sources to query.
To manage the metadata of a knowledge source:
-
In the Knowledge tab, click the dropdown button next to the knowledge source you want to configure.
-
Select Metadata from the dropdown menu.
-
Optionally, enter a Description to provide additional context about the source. This description helps the agent understand when and how to use this source during retrieval.

-
Enable the Use tags toggle to assign tags to the source. Use the Tags field to add one or more tag labels.
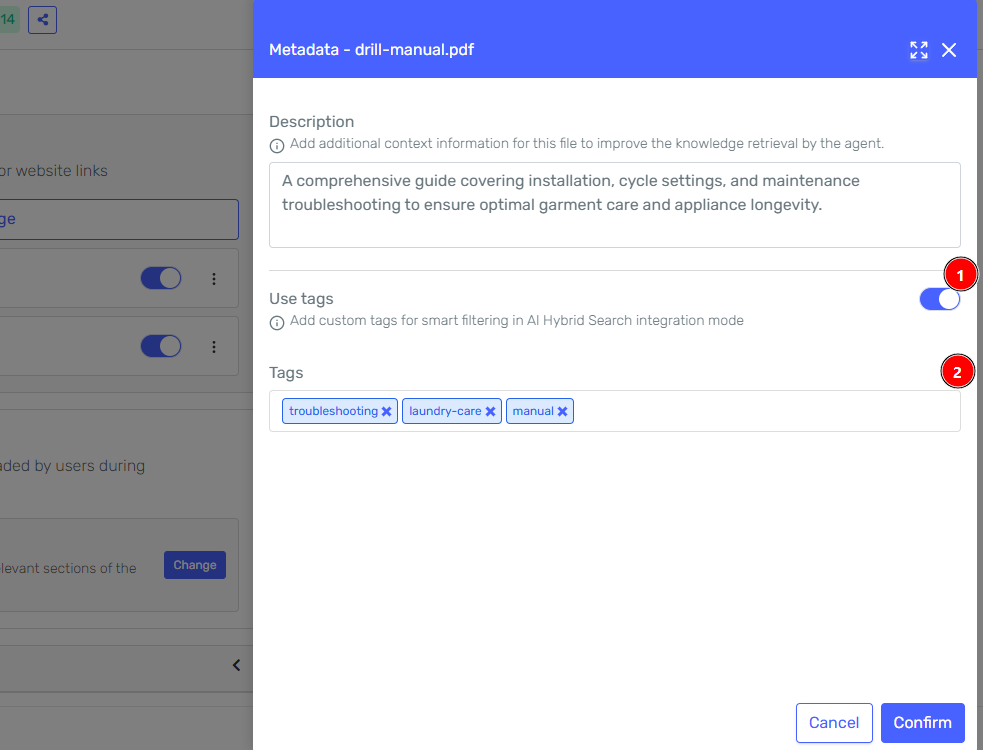
-
Click Confirm to save the metadata.
Use descriptive, consistent tag names across related sources — for example, finance, hr, or legal — to make tag-based filtering effective.
Versioning
A knowledge source is always linked to an agent version. Therefore, a draft version of the agent may be automatically created if one doesn't already exist. This occurs in the following scenarios:
- When a new knowledge source is added
- When a knowledge source is reprocessed
- When a section of a knowledge source is edited or deleted
If changes are not saved, they will remain only in the automatically generated draft version of the agent.
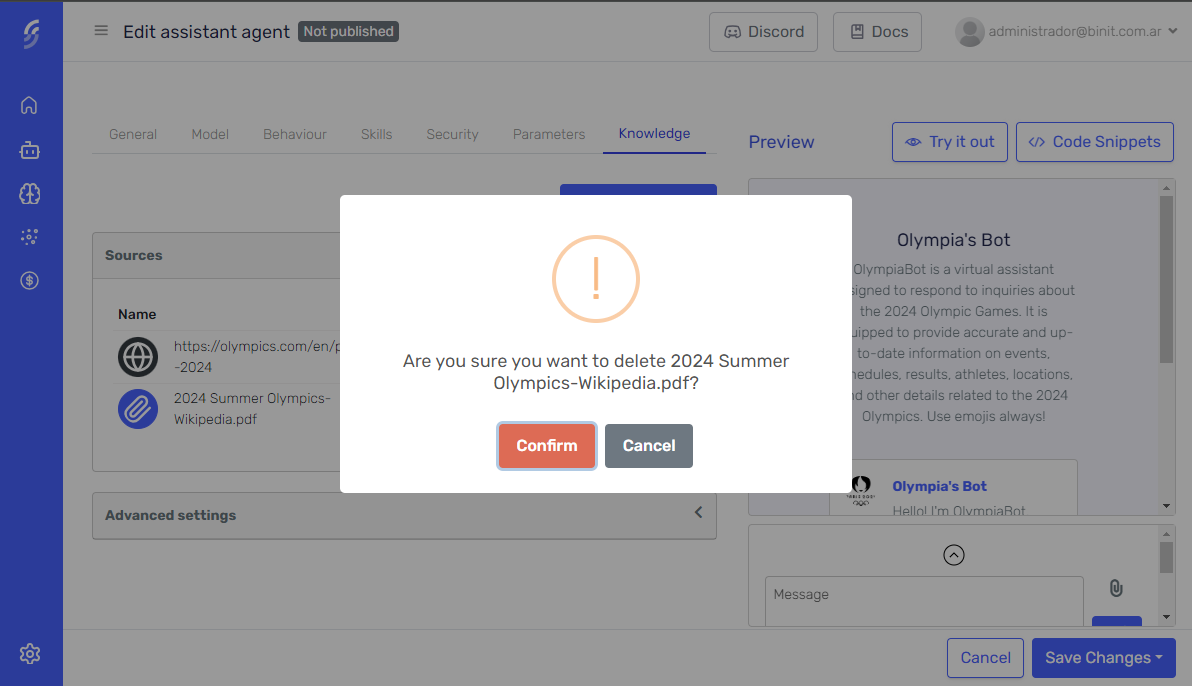
Delete
To delete a knowledge source, click the dropdown button next to the file or website you wish to delete. From the dropdown menu, select the "Delete" option. This action will prompt you to confirm the deletion.

Once you confirm, the deletion process begins. Serenity* Star will first delete the generated embeddings associated with the file. After the embeddings are removed, the file itself will be deleted from the system. This two-step process ensures that you have a chance to review and confirm your decision before the file and its associated data are permanently removed.
Test your agent with the new knowledge
Use the Agent Designer's preview pane to interact with the agent and check that it is using the knowledge correctly.

Tag Filtering
Tags are metadata labels assigned to individual knowledge sources. They serve two purposes:
- Organization — Group sources by topic, domain, department, or any custom taxonomy.
- Retrieval scoping — When
knowledgeTagsis included in an execute request, the system restricts knowledge retrieval exclusively to sources that carry at least one of the specified tags, regardless of the retrieval mode configured for the agent.
Configuring Tags on Knowledge Sources
Tags are assigned to knowledge sources through the Metadata panel. For step-by-step instructions on how to open the panel and assign tags, see Manage Metadata.
Constraints:
- Maximum 20 tags per source.
- Maximum 50 characters per individual tag.
- Leading and trailing whitespace is trimmed automatically.
Tags are case-sensitive. A source tagged Finance will not match a filter value of finance.
Sending knowledgeTags in an Execute Request
To activate tag-based filtering at execution time, include the knowledgeTags input parameter in the execute call.
| Property | Value |
|---|---|
| Parameter name | knowledgeTags |
| Type | String |
| Format | Comma-separated list of tag values |
Example:
{
  "input": [
    { "key": "message", "value": "What are the Q4 targets?" },
    { "key": "knowledgeTags", "value": "finance, 2024" }
  ]
}
When knowledgeTags is not sent, all available knowledge sources remain eligible for retrieval — behavior is identical to the default.
When knowledgeTags is sent with a malformed value (for example, empty entries or a non-string value), the execute call returns a validation error.
Filtering Semantics
OR logic between tags
The filter uses an OR condition. A source is included if it matches at least one of the provided tags.
| Source | Tags configured | Result with knowledgeTags = "finance, legal" |
|---|---|---|
| Source A | finance | Included — matches finance |
| Source B | legal, hr | Included — matches legal |
| Source C | hr | Excluded — no match |
| Source D | (no tags) | Excluded |
Sources with no tags are excluded
When knowledgeTags is provided, sources that have no tags configured are not included in the eligible set, even if their content would be semantically relevant.
Pre-filter applies before any retrieval step
The tag filter is applied before the similarity search, LLM query generation, or any section ranking. The agent cannot retrieve content from excluded sources regardless of how strongly the content would otherwise match the query.
Behavior Summary
| Scenario | Result |
|---|---|
knowledgeTags not sent | All sources eligible — no change from default behavior |
knowledgeTags sent, sources match | Only matching sources are searched |
knowledgeTags sent, no sources match | No knowledge is retrieved; agent responds without knowledge context |
knowledgeTags sent, source has no tags | Source is excluded even if semantically relevant |
knowledgeTags sent, OR logic | Source included if at least one of its tags appears in knowledgeTags |
knowledgeTags sent, invalid format | Execute returns a validation error |
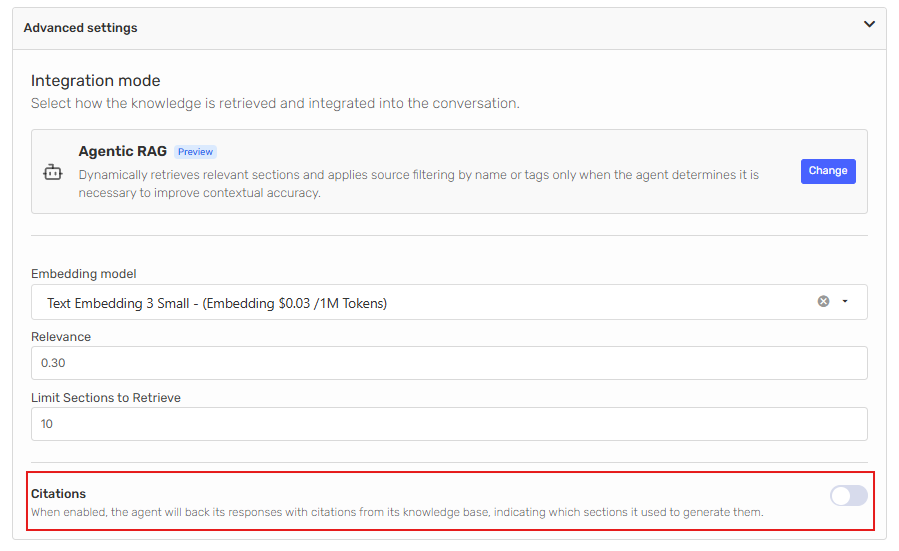
Advanced Settings
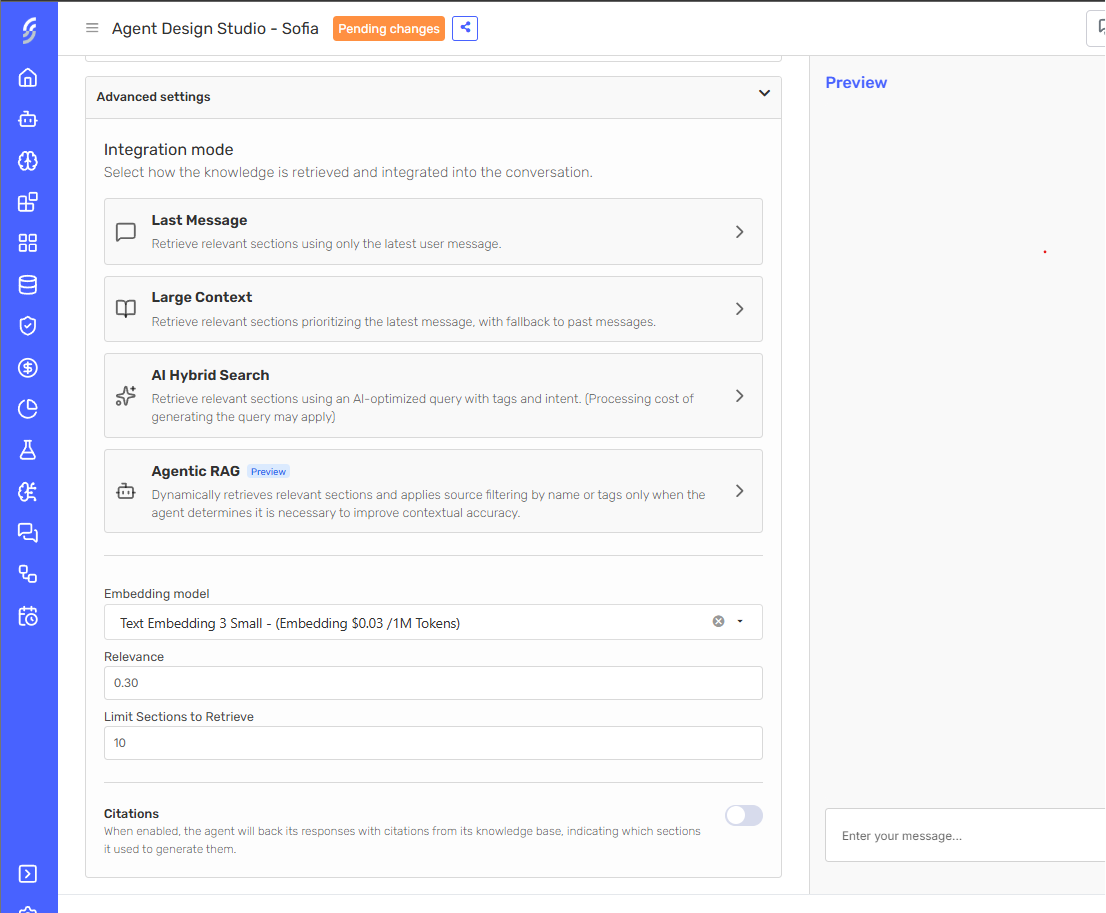
Within the advanced settings section, you can modify the following parameters.
-
Knowledge Integration Mode: Controls how the agent retrieves and incorporates information from your knowledge base into each conversation. See Knowledge Integration Mode for a detailed description of each option.
-
Embedding Model: Model used to generate the vectors.
You must have previously configured the API Key of the AI model vendor to use it.
-
Relevance: A decimal value between 0 and 1 that defines how similar the results should be when the agent searches for relevant information.
-
Limit Sections to Retrieve: An integer value between 1 and 20 that sets the maximum number of sections that can be obtained from the files.
-
Citations: When enabled, the agent backs each part of its response with a reference to the knowledge section that supports it. See Citations for setup instructions.
Knowledge Integration Mode
Knowledge Integration Mode controls how the agent retrieves and incorporates information from your knowledge base into each conversation. Selecting the right mode balances retrieval accuracy, context breadth, and processing cost.
Last Message
The agent uses only the most recent user message as the search query. It performs a vector similarity search across all available knowledge files and injects the most relevant sections directly into the user message context.
How it works:
- The latest user message is used verbatim as the semantic search query.
- A similarity search runs across all knowledge files without any tag or source filtering.
- Matching sections are appended to the user message before it is sent to the model.
When to use it:
- Conversations are self-contained and each question carries enough context on its own.
- The knowledge base is small or highly focused, so broad retrieval is acceptable.
- You want the lowest latency and processing overhead.
Does not consider conversation history — if the user refers to something mentioned earlier, relevant sections may be missed. Tag filtering via the knowledgeTags execute parameter is supported. Source name filtering is not applicable in this mode — the last user message is used directly as the search query without agent-driven source selection.
Large Context
The agent builds the search query from multiple recent messages, giving it a broader view of the conversation before searching the knowledge base.
How it works:
- Recent messages from the conversation are concatenated into a single query.
- Results are grouped by source file and injected into the system definition context.
- If tags are detected in the conversation input, only knowledge files matching those tags are searched.
When to use it:
- Topics evolve across multiple turns and earlier messages provide important context.
- Users tend to ask follow-up questions that depend on what was previously discussed.
Concatenating many messages can dilute the semantic signal of the query. Tag filtering is supported via the knowledgeTags execute input parameter. When provided, the tag pre-filter is applied before the similarity search, consistently with all other retrieval modes.
AI Hybrid Search
The agent uses the AI model to analyze the full conversation and generate an optimized search query, along with relevant document tags and specific source names to pre-filter the search.
How it works:
- If the
knowledgeTagsexecute parameter is provided, the tag pre-filter is applied to all available sources before the AI model processes the request. - The AI model analyzes the conversation and produces:
- A concise semantic query optimized for vector similarity search.
- A list of relevant tags to further narrow the pre-filtered source set.
- A list of relevant source names to restrict the search to specific files.
- The similarity search runs against the final filtered document set.
- Matching sections are injected into the system definition context.
When to use it:
- The knowledge base is large and contains documents across multiple topics or categories.
- Conversations are complex and the user intent is not obvious from a single message.
- You use tags or source names to organize your knowledge files and want the agent to apply filters automatically.
Each retrieval triggers an additional AI model call to generate the search query. This may incur extra token processing costs depending on your model configuration.
Agentic RAG
This feature is currently in preview.
The agent decides autonomously whether to query the knowledge base and, when it does, formulates its own search query based on the conversation context. Rather than always retrieving knowledge on every message, the agent evaluates whether additional information is actually needed before performing a search. It also selects which tags and source names to apply, making retrieval both selective and precise.
How it works:
Tag filtering in Agentic RAG operates in two independent layers:
- Layer 1 — Hard constraint (
knowledgeTagsexecute parameter): IfknowledgeTagsis provided, the eligible source universe is reduced before the agent function is registered. The knowledge plugin description shown to the agent only lists pre-filtered sources — including each source's name, tags, and description (when configured) — so the agent has no knowledge of excluded sources. - Layer 2 — Soft refinement (agent-driven selection): When the agent decides to perform a knowledge lookup, it may further narrow the pre-filtered source set by selecting specific tags or source names from those available to it.
Both layers use OR logic within their respective tag lists. Layer 2 cannot expand beyond the constraint established by Layer 1.
The full sequence is:
- The
knowledgeTagspre-filter (Layer 1) reduces the eligible source set and updates the knowledge plugin description accordingly. - The agent analyzes the conversation and decides whether a knowledge lookup is needed to answer accurately.
- When it determines a lookup is needed, it generates:
- A semantic query based on the user's intent.
- Relevant tags to further narrow the pre-filtered source set (Layer 2).
- Relevant source names to restrict the search to specific files (Layer 2).
- A vector similarity search is performed against the final filtered set and the most relevant sections are incorporated into the response.
When to use it:
- Not every user message requires a knowledge lookup (for example, greetings, clarifications, or out-of-scope questions should not trigger retrieval).
- You want the most precise retrieval — the agent only fetches what it actually needs.
- The knowledge base contains many sources and unnecessary retrievals would add noise.
- The agent may occasionally decide not to retrieve knowledge even when it would be beneficial.
- Retrieval quality depends on the model's reasoning capabilities.
Citations
Knowledge Citations allow the agent to link specific parts of its responses back to the knowledge sections it used to generate them. When a user receives an answer, each supported passage is traceable to a source document and section, making responses more transparent and verifiable.
This feature is not supported for datasets yet.
Enabling Citations
-
Open the agent you want to configure and enter its edit view.
-
Go to the Knowledge tab.

-
Expand the Advanced Settings panel of the Knowledge tab.
-
Locate the Citations toggle and enable it.
-
Once enabled, a citations prompt is displayed in a read-only block, along with a Copy button and an instruction to add the text to the agent's system definition.
-
Click Copy to copy the prompt text to your clipboard.
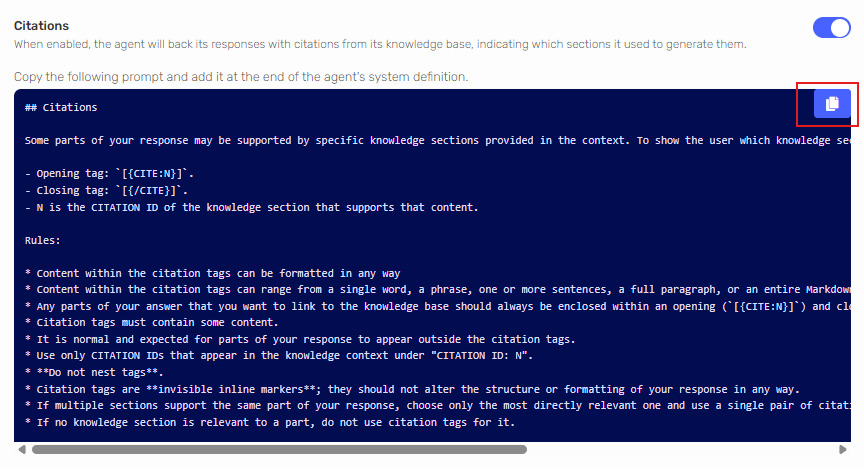
-
Navigate back to the main agent screen and click the Behaviour section. Click Edit next to System definition and paste the copied text at the end of the existing content.
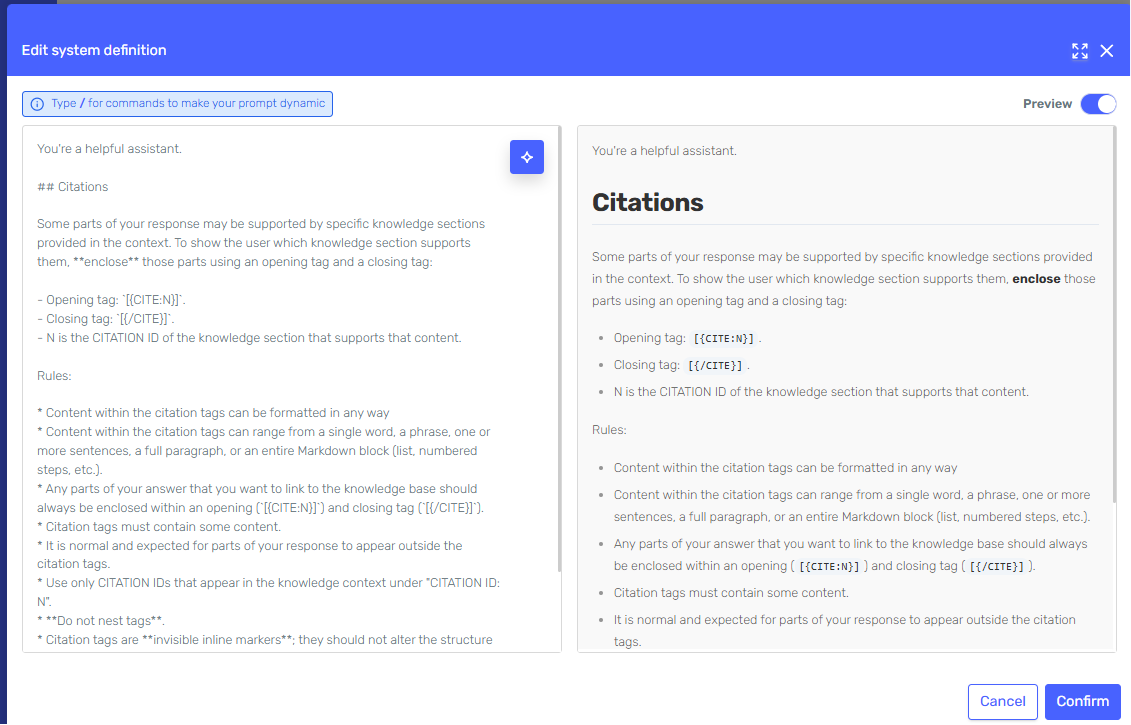
The citations prompt must be present in the agent's system definition for citations to be generated. If you enable the toggle but do not add the prompt to the system definition, the agent will not produce citations in its responses.
When to Use It
- You want users to be able to verify which knowledge source supports a given answer.
- The knowledge base contains multiple documents and traceability is important.
- You are building a use case where accuracy and source attribution are required (for example, legal, compliance, or technical support scenarios).
Supported Files
| FILE FORMAT | MIME TYPE |
|---|---|
| .txt | text/plain |
| application/pdf | |
| .doc | application/msword |
| .docx | application/vnd.openxmlformats-officedocument.wordprocessingml.document |
| .csv | text/csv |
| .md | text/markdown |