
A Guide to Executing POST Requests with Serenity* Agents

· 10 min read

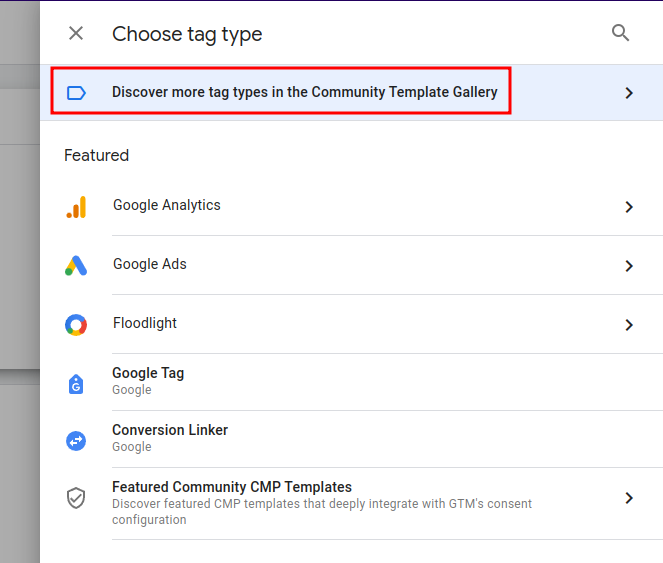
Serenity* Agents can execute HTTP requests via the HttpRequest Skill. This skill allows us to describe the endpoint we want to execute, including the method, headers, authentication, and body.

This article will explore how to use this skill to execute POST requests. We'll see how to configure this skill to provide an AI-generated body for the request and, most importantly, ensure the agent knows how to build a valid body and when to use each skill.

We'll iterate from a simple starter agent to a more robust one, testing and improving it along the way.

About the example

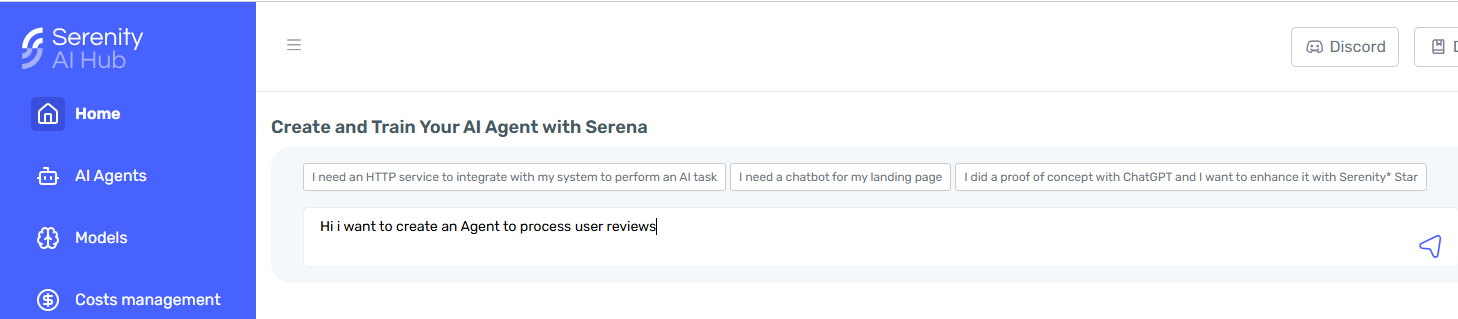
We'll create an agent whose goal will be to help us schedule meetings and events based on a prompt.

For this example, I created a mock API with two endpoints:

  • POST /meeting/schedule to schedule a meeting
  • POST /event/schedule to schedule an event (used for reminders or something that doesn't require attendees)

Both endpoints are intentionally similar, so we can demonstrate how to instruct the agent to use the right skill for each case.

We'll give our agent access to these endpoints via the HttpRequest Skill.

For example, if the agent receives a prompt like "Schedule a meeting for the product demo on September 22nd at 3 pm. It should take 45 minutes," it should execute the following request:

curl -X POST "https://<my-mock-api>/meeting/schedule" -H "Content-Type: application/json" -d '{
"datetime": "2025-09-22T15:00:00",
"duration": 0.75,
"subject": "Product demo",
"attendees": [],
"location": null,
"description": null
}'

Setting up the Agent

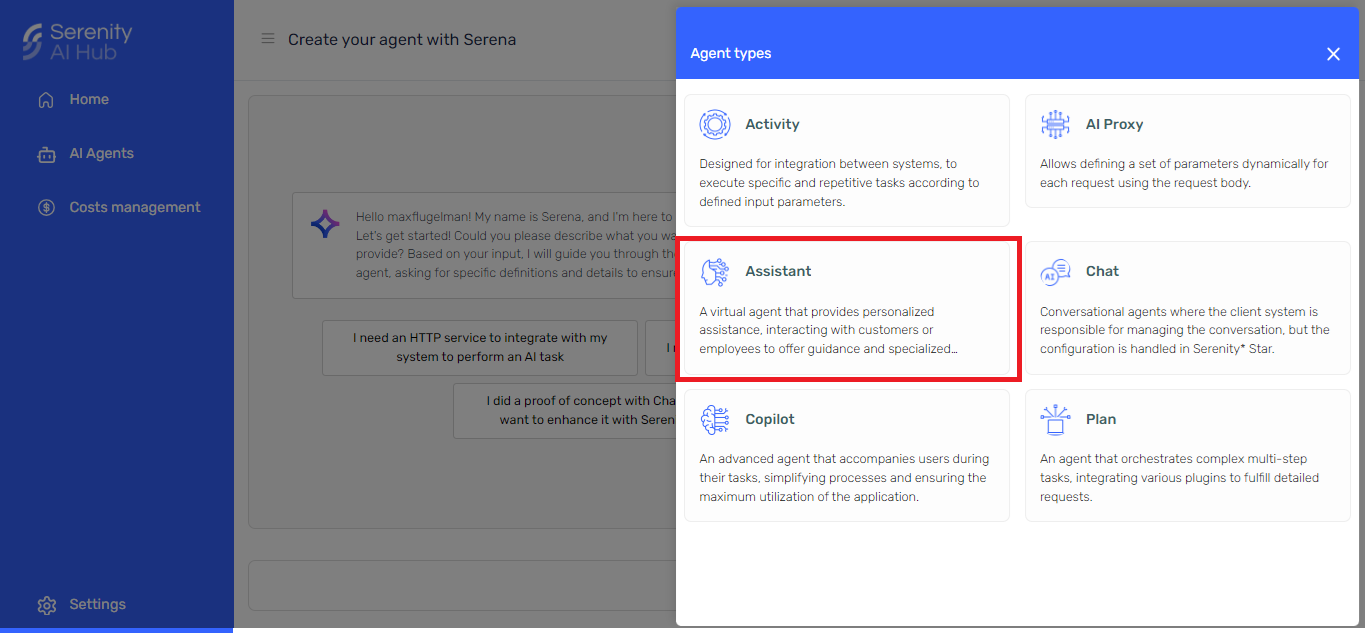
For this example, we will create an Activity agent. It will receive a prompt that will be used to decide which skill to use, if any.

General Tab

General tab describing the calendar organizer agent

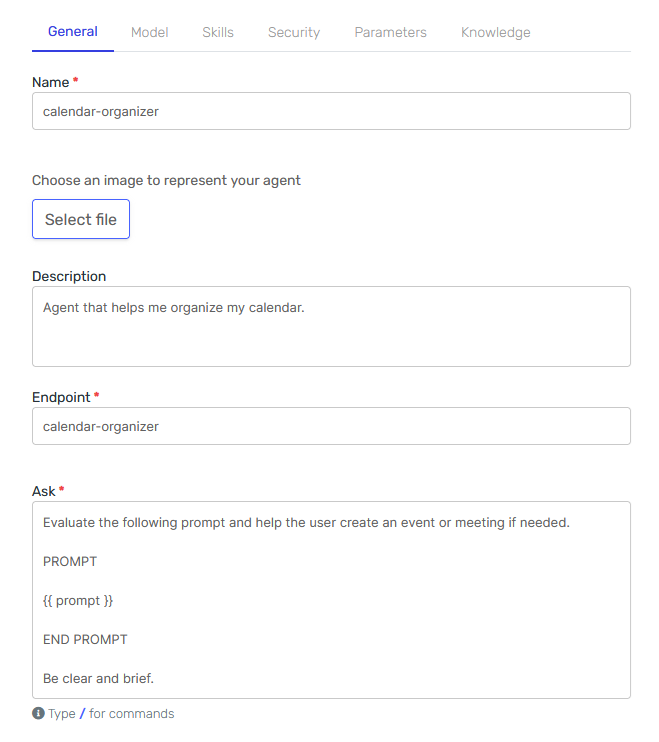
The main thing to notice here is the "Ask" field. That's the instruction the agent will receive. As you can see, it includes an input parameter called prompt.

We'll keep it simple for now.
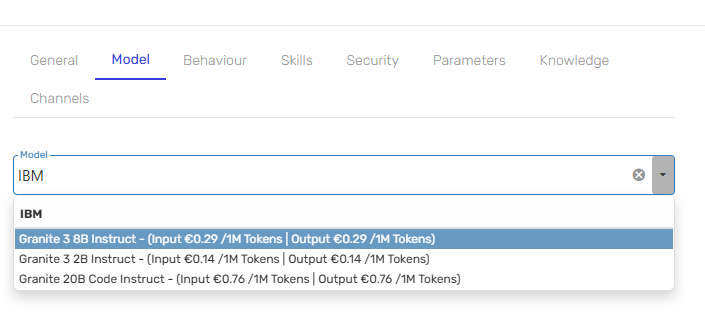
Model Tab

Model tab showing how I seleccted OpenAI&#39;s GPT 4.o Mini

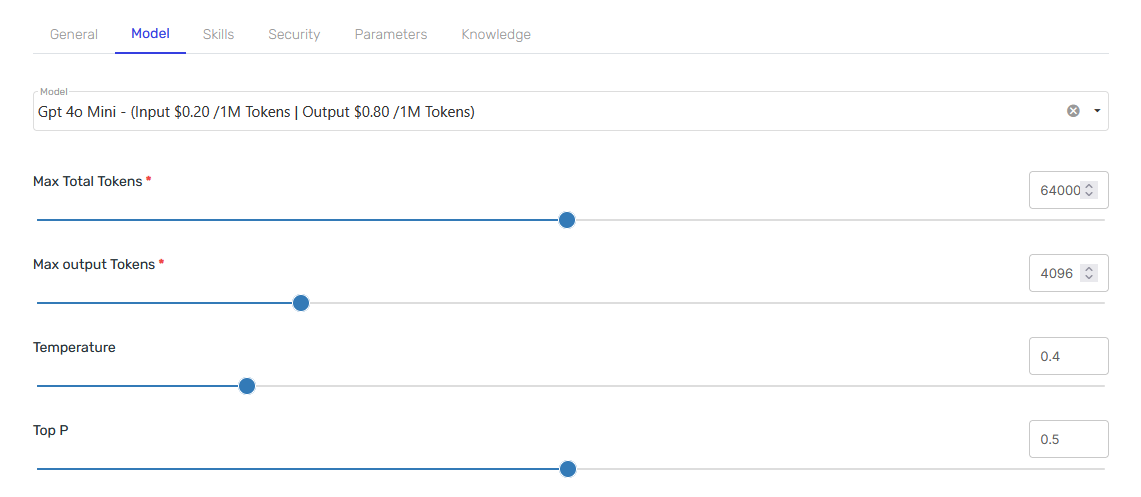
In this tab, select OpenAI's GPT 4o Mini and leave everything else as default.
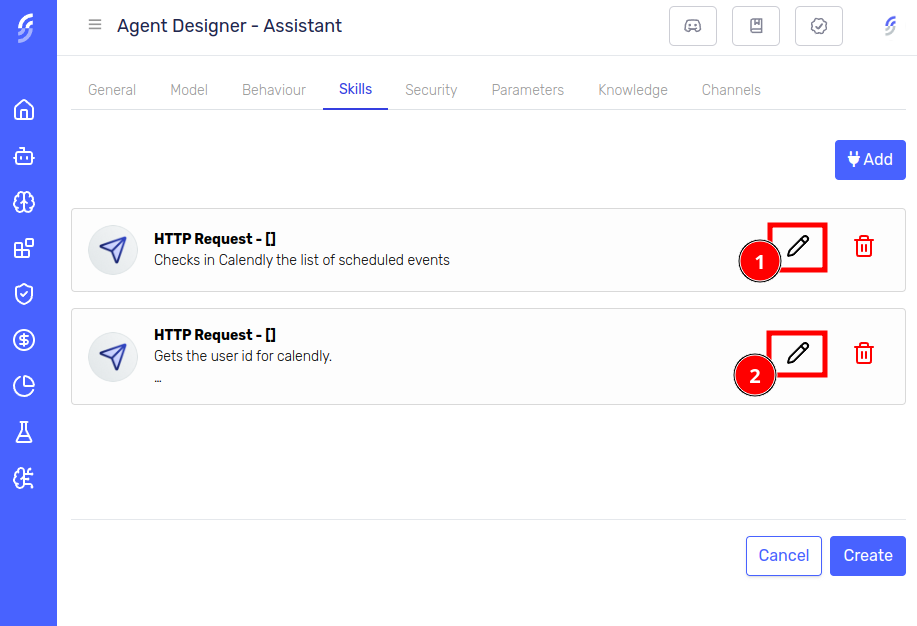
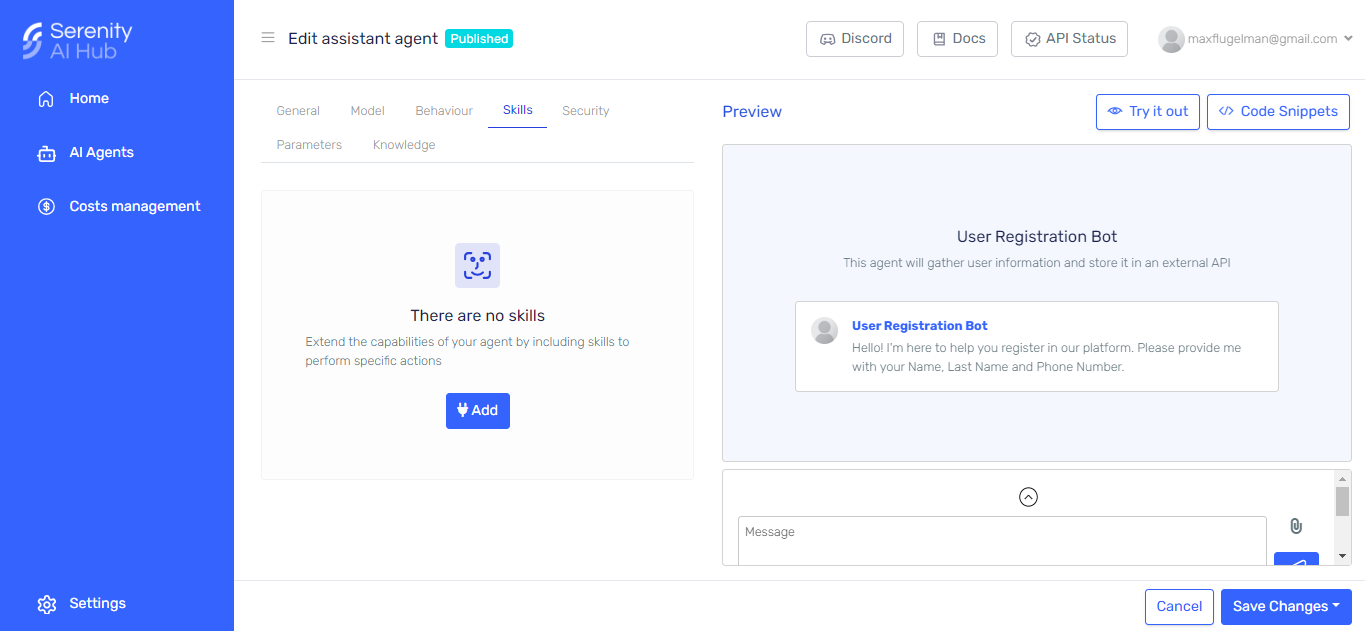
Skills Tab

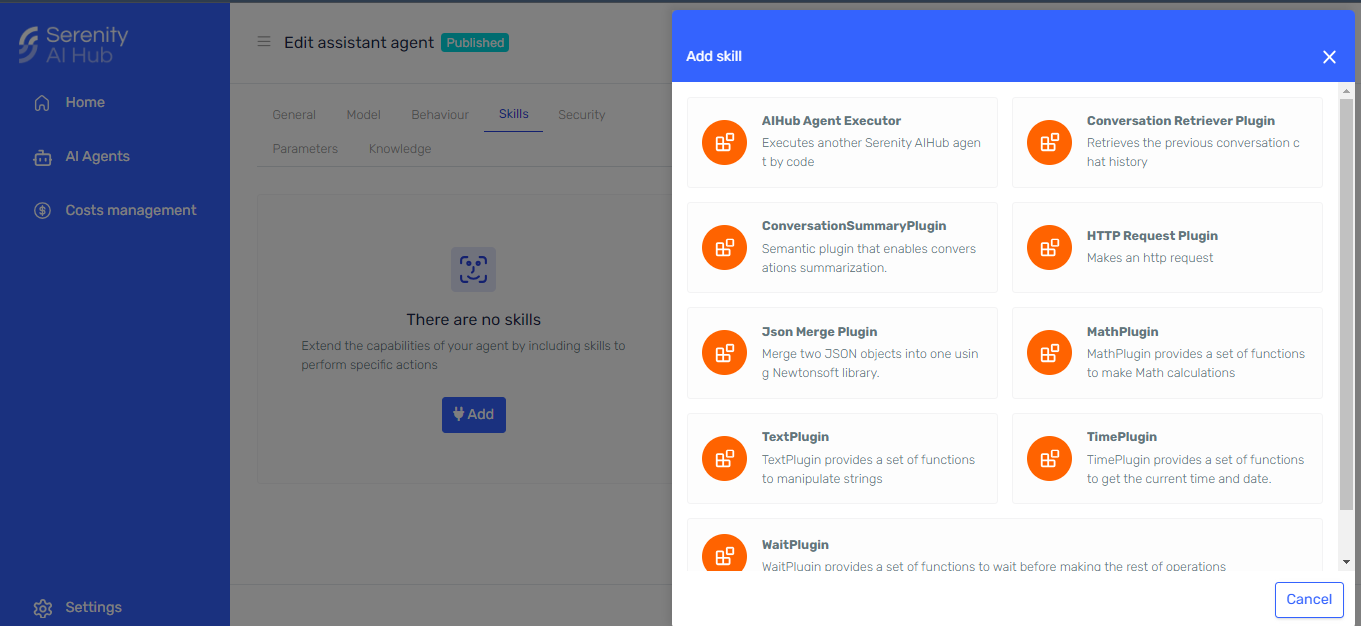
Time to add our two HTTP Request Skills.

Meeting Skill

HTTP Request form for the meeting skill

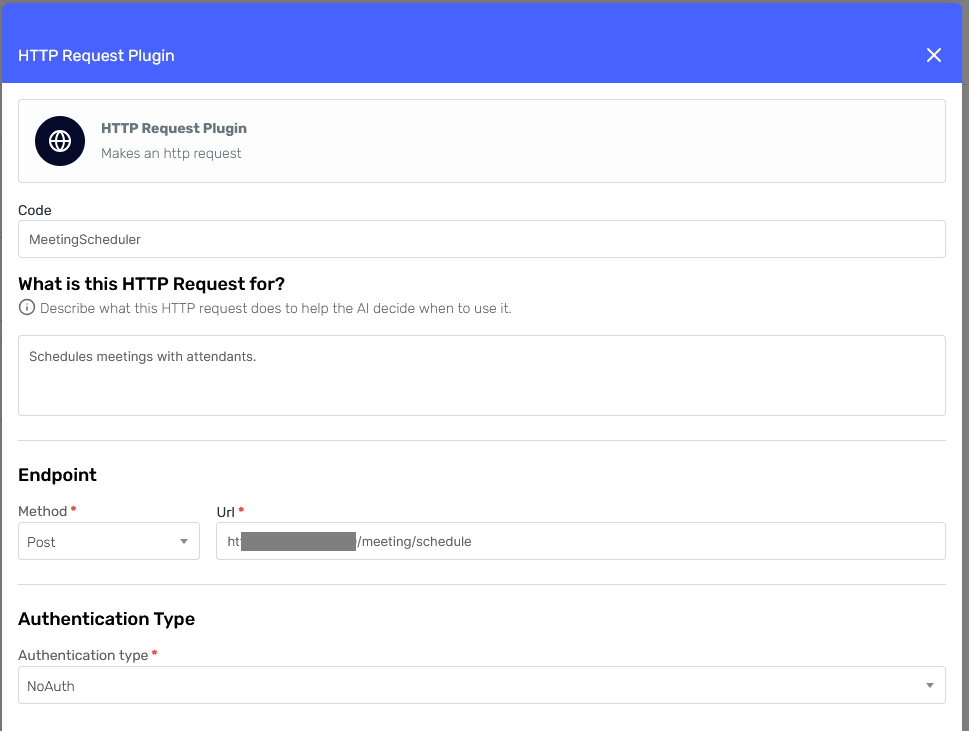
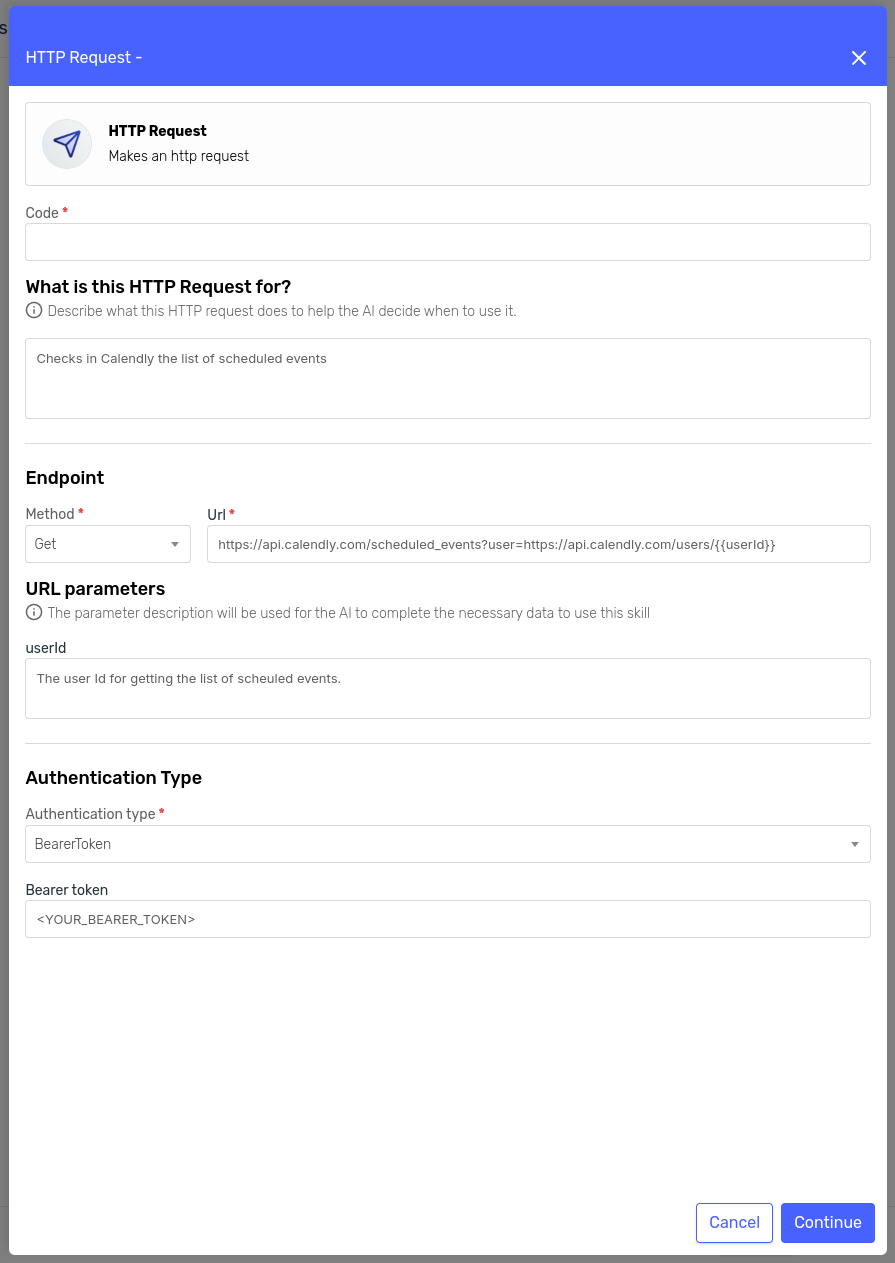
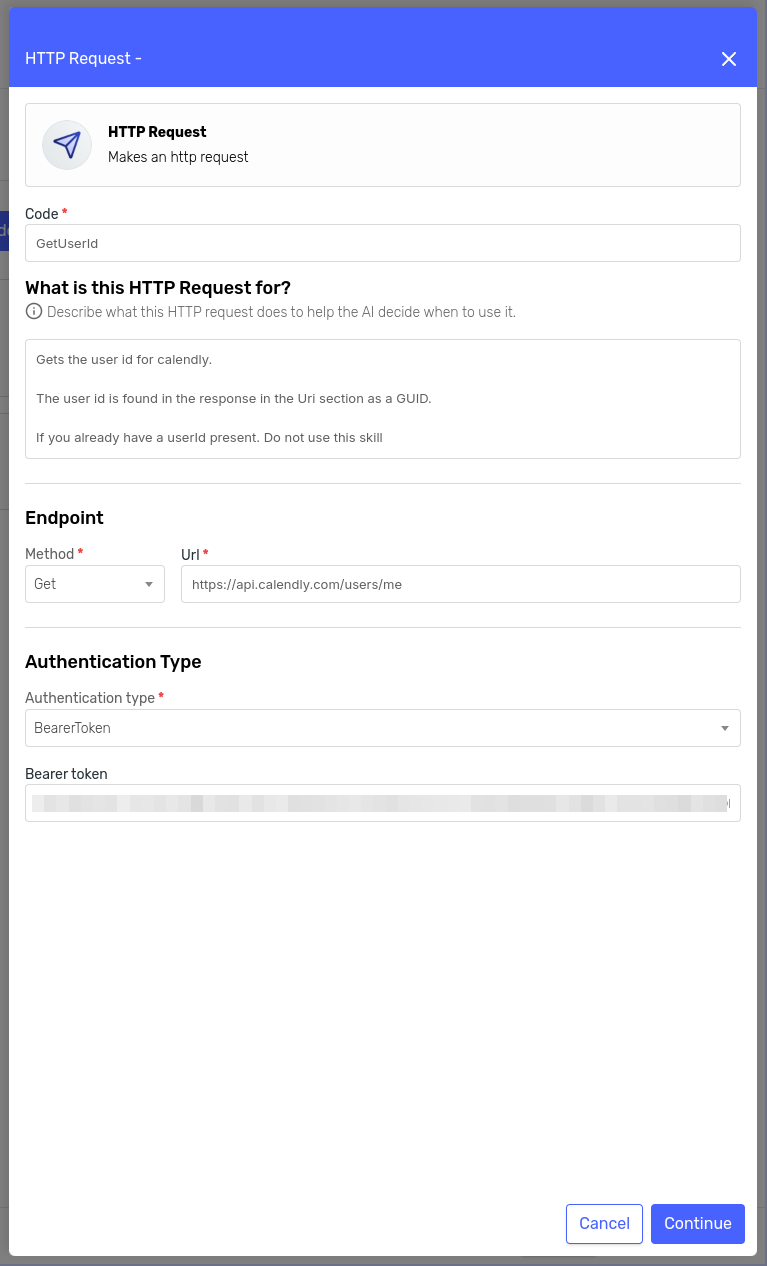
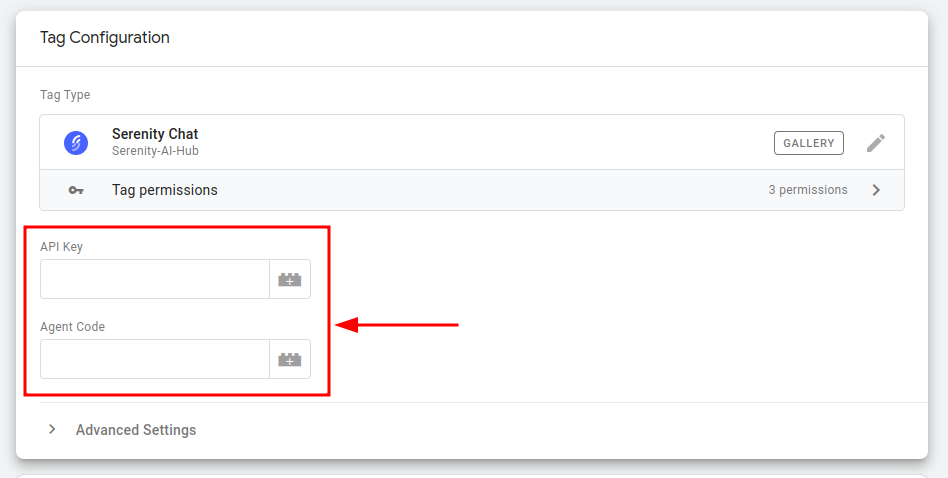
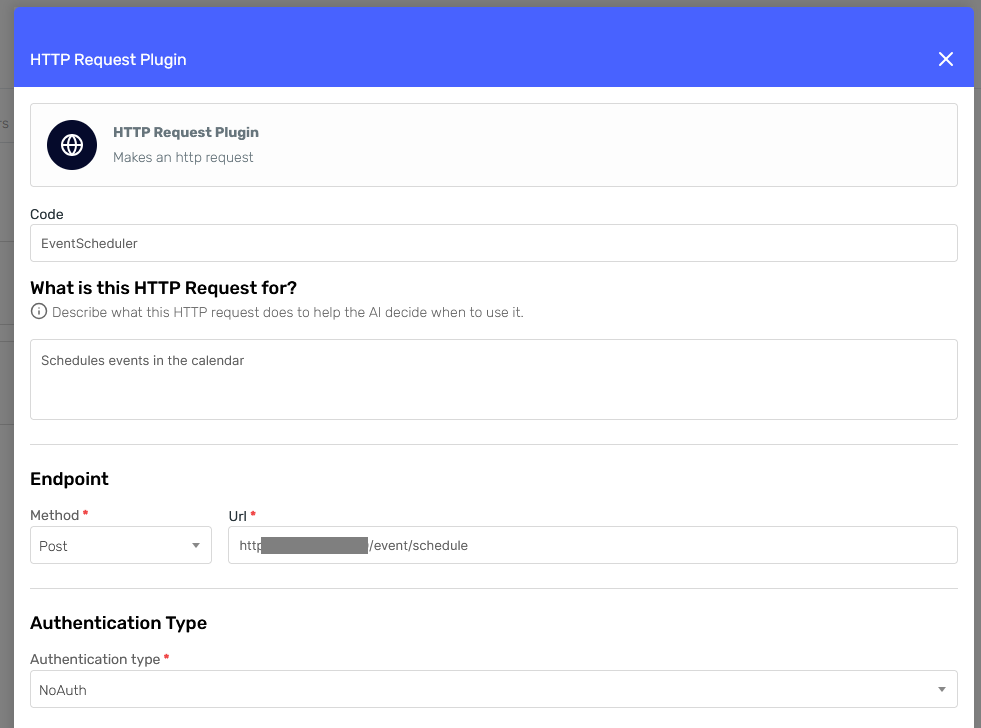
The first section of the form asks us for the following information:

  • Code: This should be a unique code to identify this particular skill. It will also help us identify the skill in the agent's response and logs.
  • Description: Describe what the skill does, when to use it, any important notes or limitations we want the agent to consider, etc.

These two fields are extremely important for the agent to determine when and how to use each skill. In this first iteration, we'll keep them brief and simple so we can see the difference when we improve them later.

For the Authentication Type, I'll select "No Auth" since my mock API doesn't require authentication.

Then, fill the Method and Url fields with the appropriate values for the meeting endpoint and press "Continue."

In the next section, we'll be asked to configure the headers and body.

The default configurations for headers and body

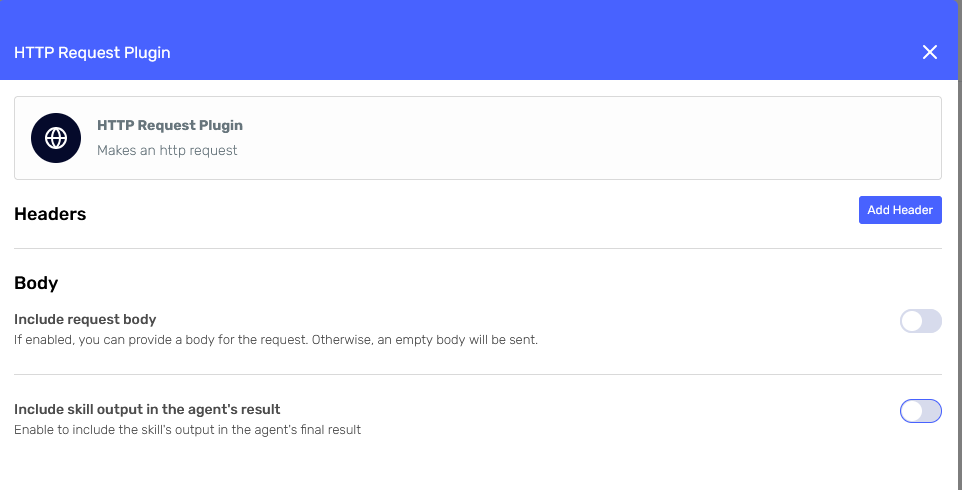
We don't need to provide any headers in this case, so we'll leave that section as is.

For the body, turn on the "Include request body" switch and select "AI-Generated Body." This will instruct the agent to generate the body considering the body description we provide, as well as the prompt and skill description.

Body description

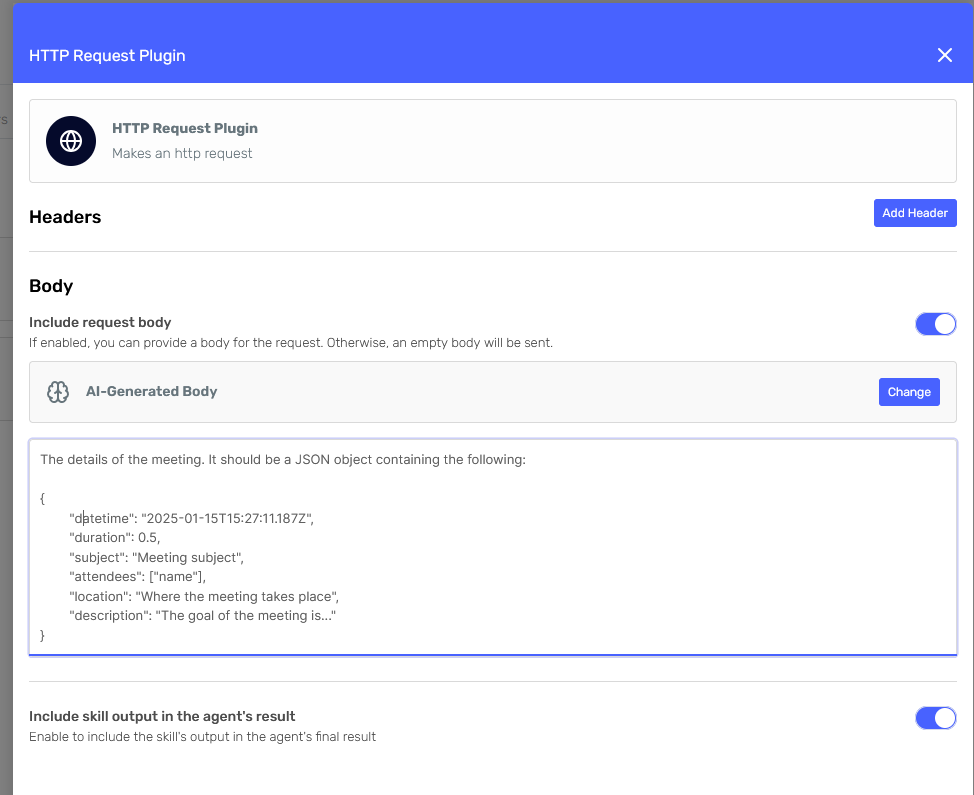
We'll simply provide a sample body with a brief description.

Finally, check the "Include skill output in the agent's result" switch at the bottom to include this skill's response in the agent's response. This will help us with our tests later.

And now, we can confirm this configuration and move on to the next skill.

Event Skill

This configuration will be similar to the previous one, so I'll just show you the resulting forms:

Event skill description

Event skill body

Now that the agent has skills, we can create it and begin testing.

Testing the first version of our agent

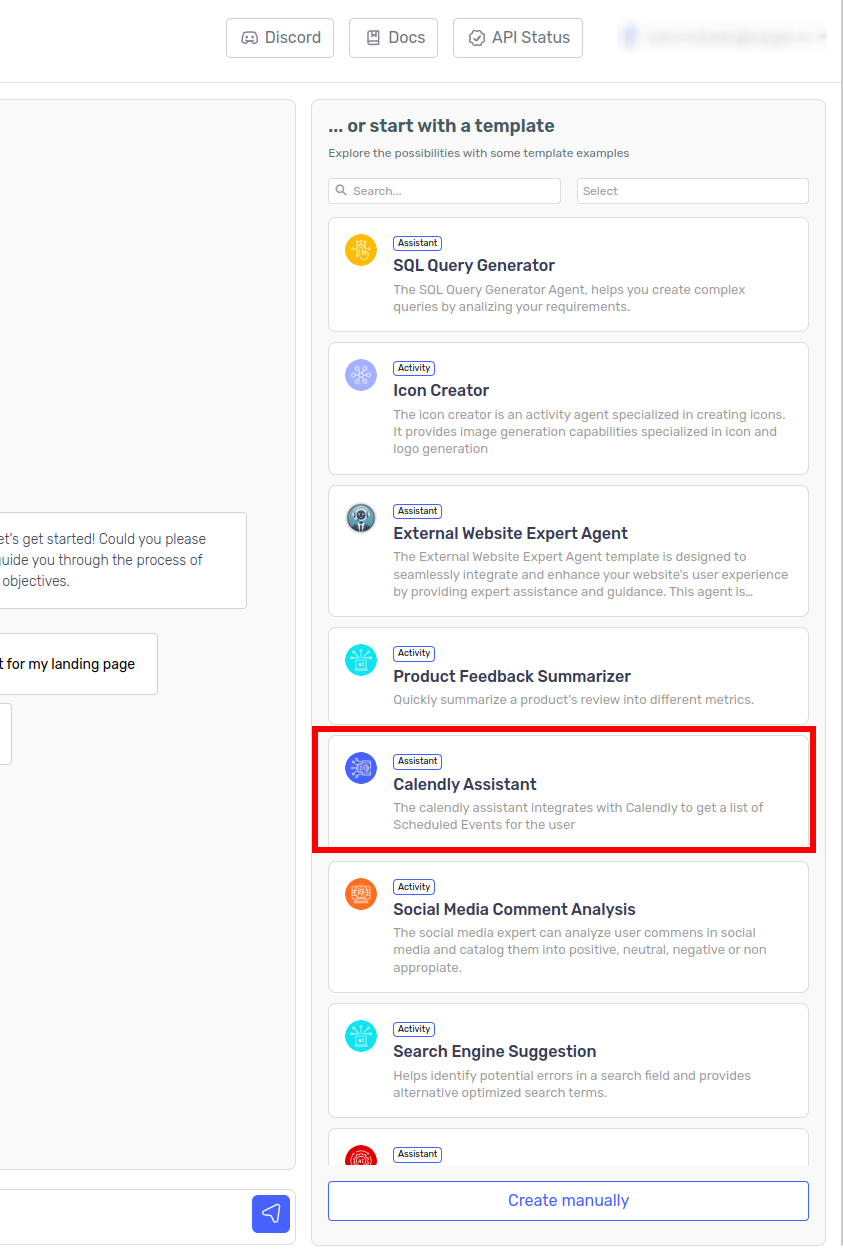
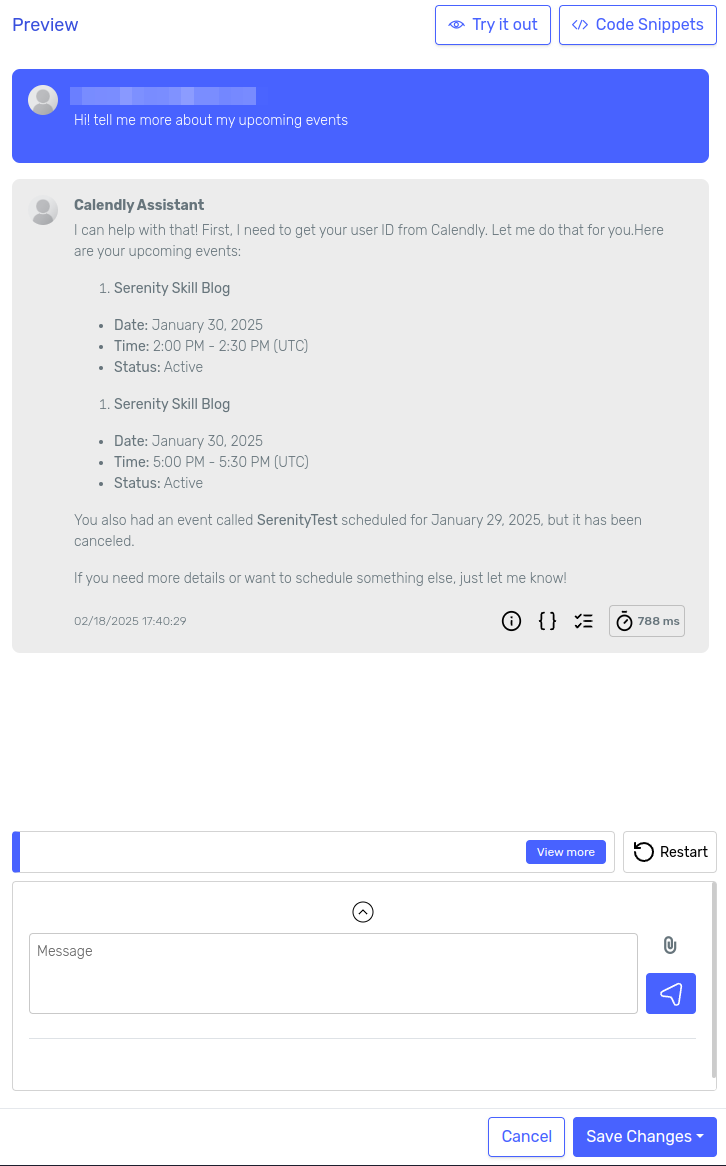
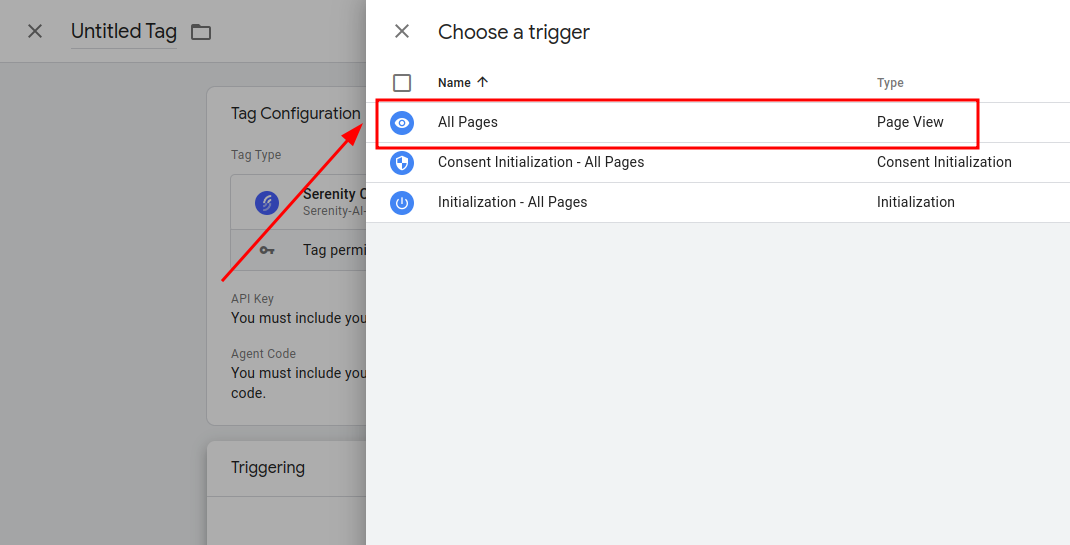
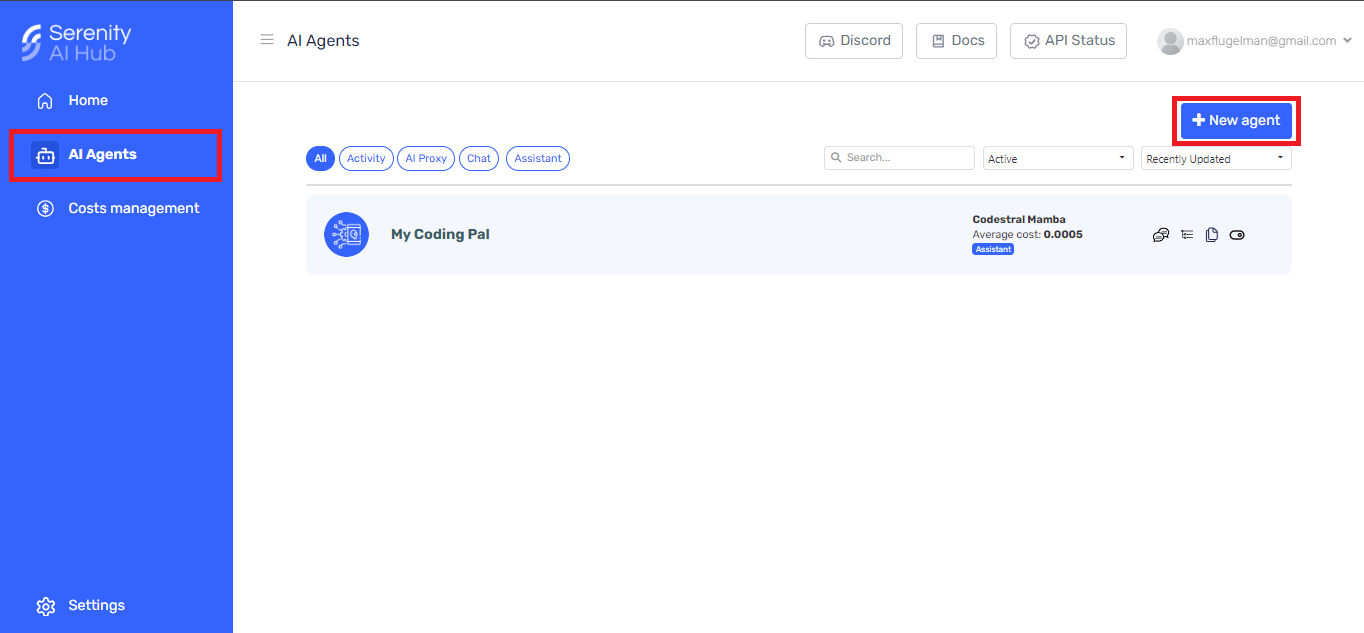
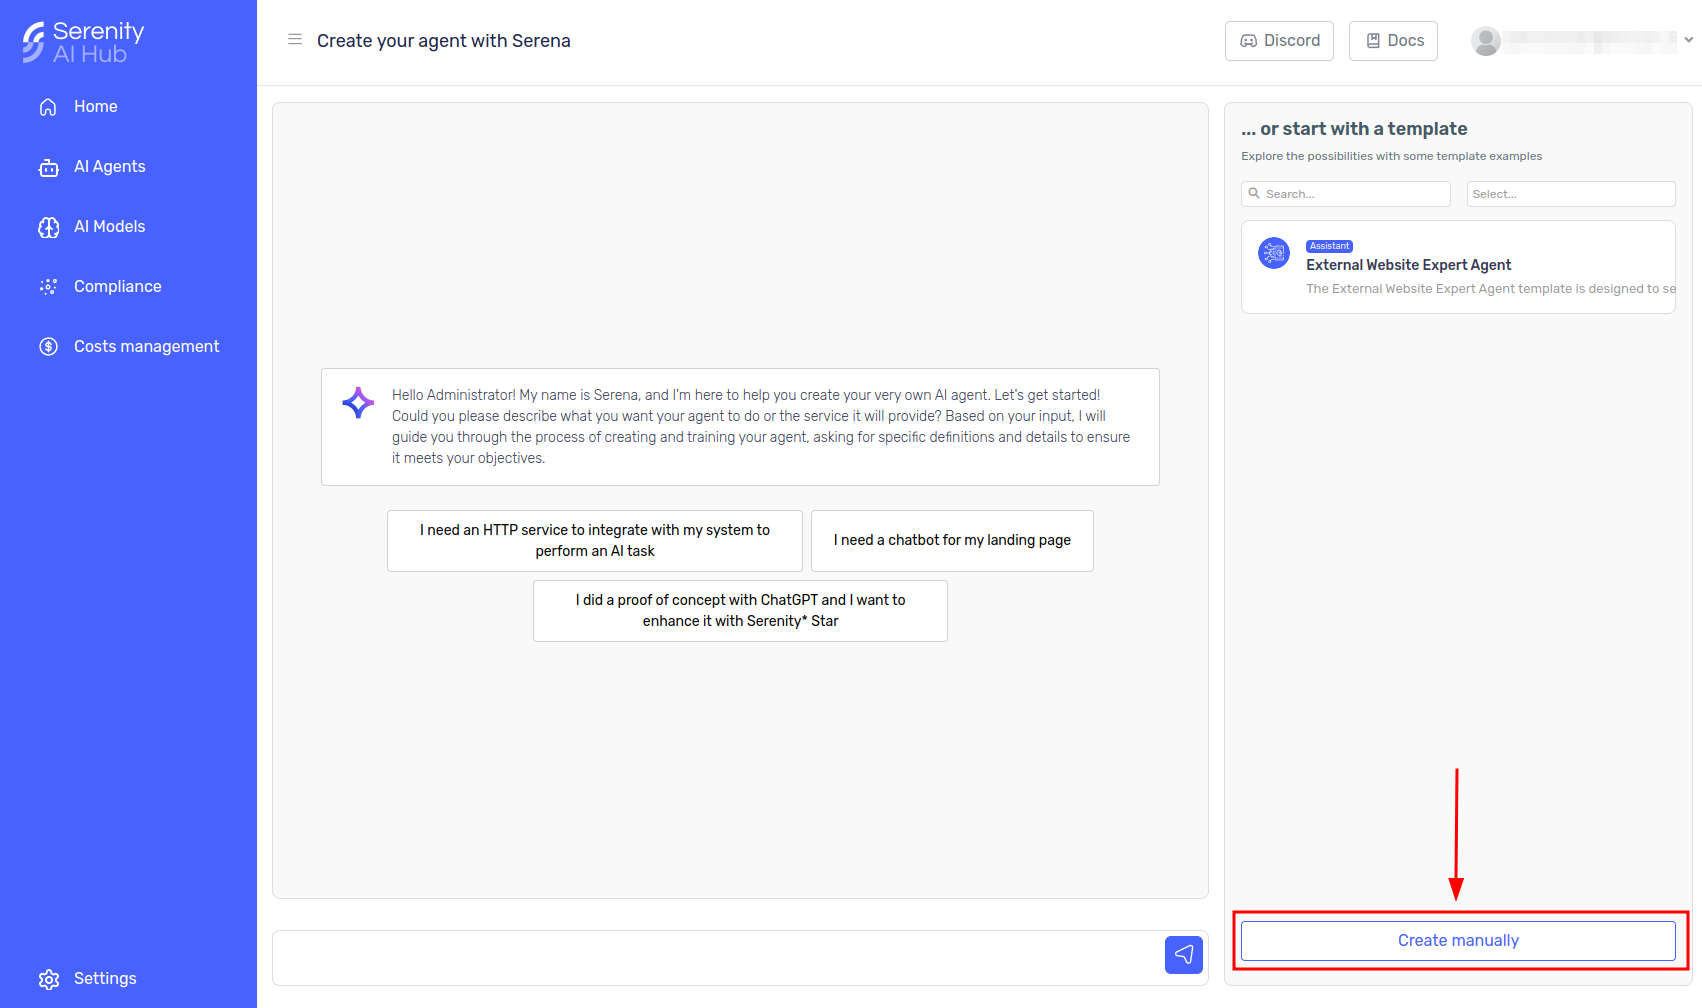
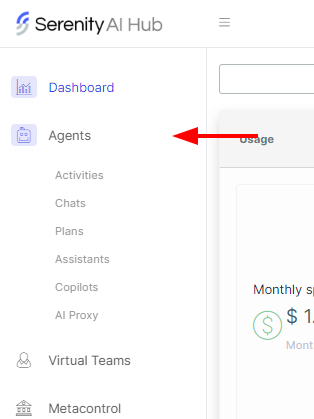
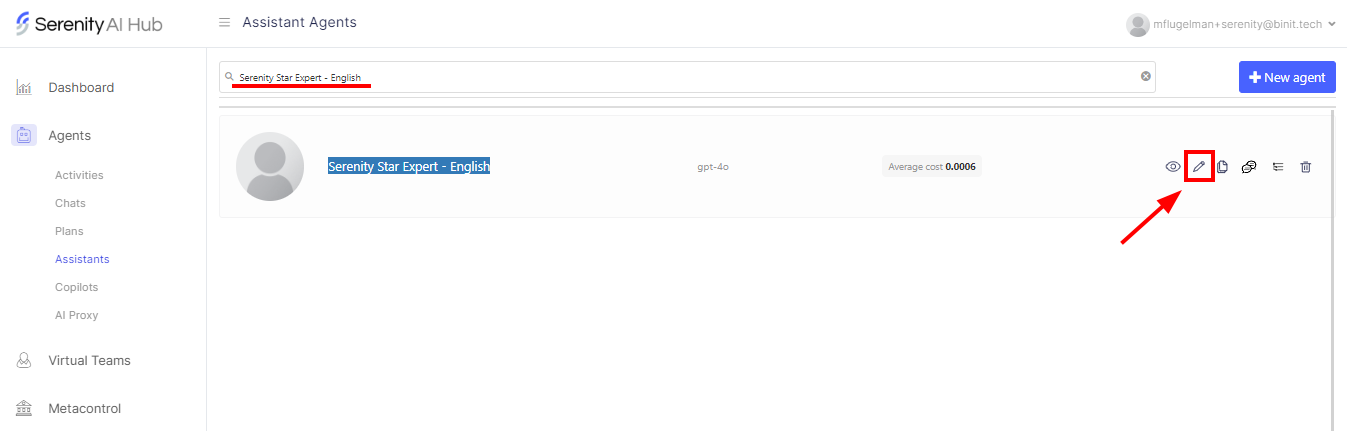
We can access our new agent from the "AI Agents" page. Click over the card to open the Agent Designer.

AI Agent list

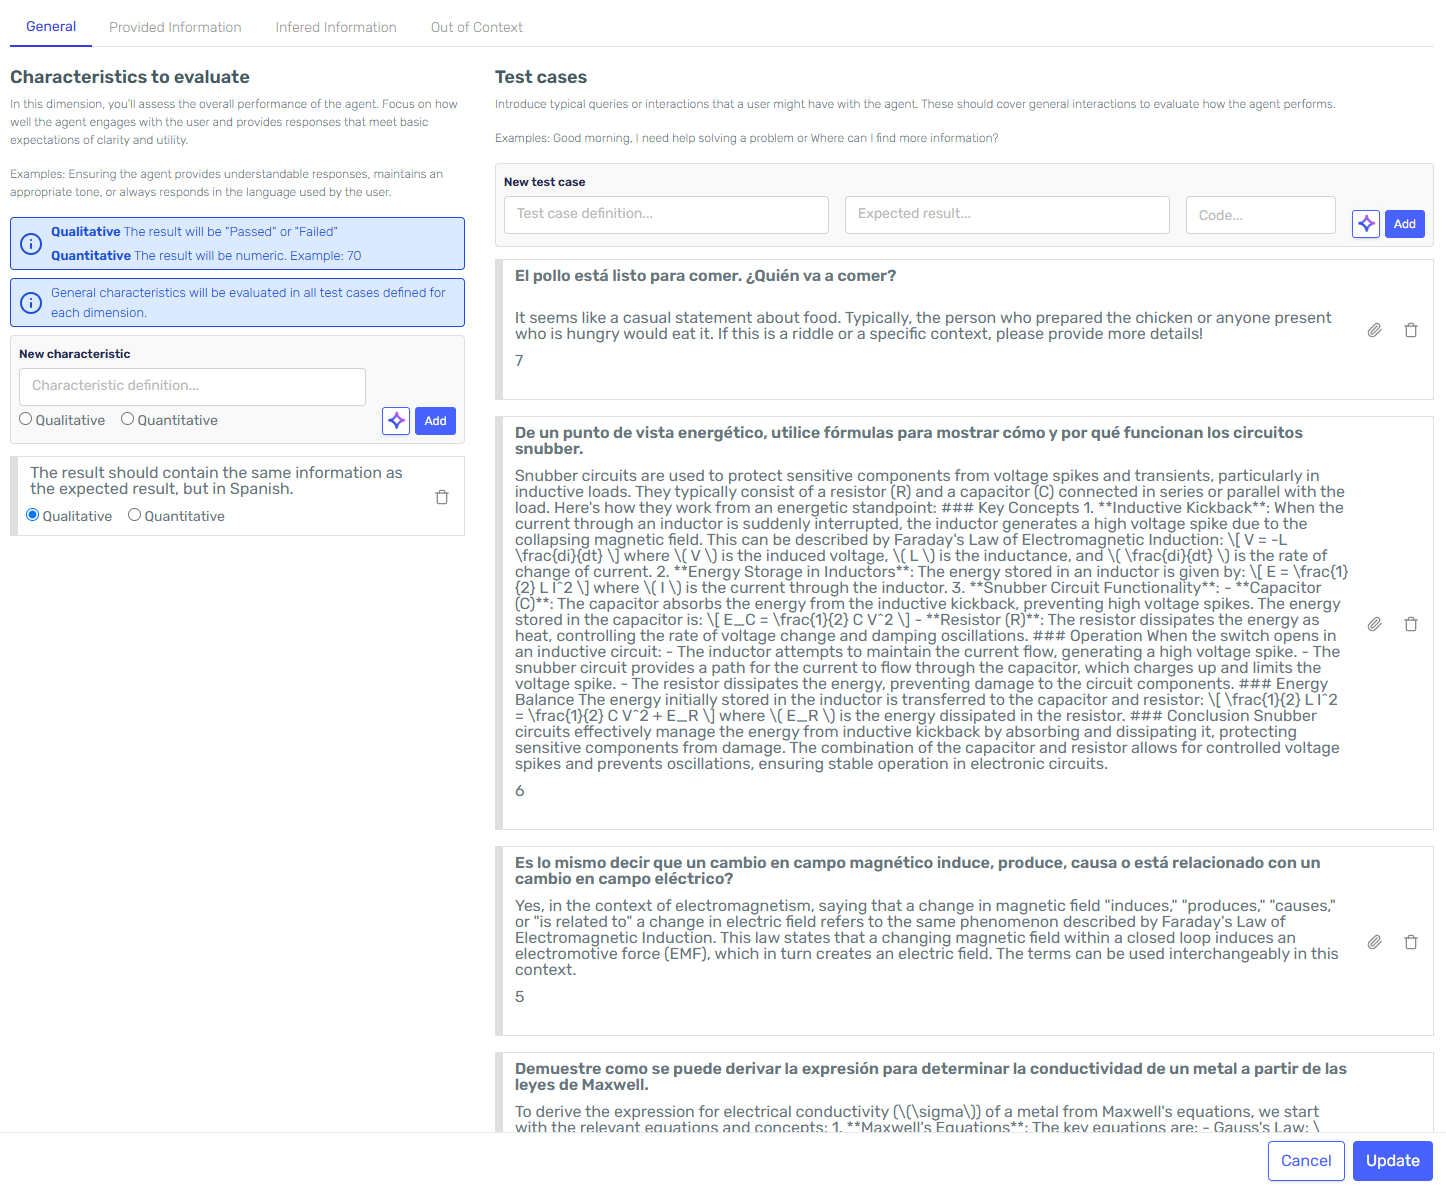
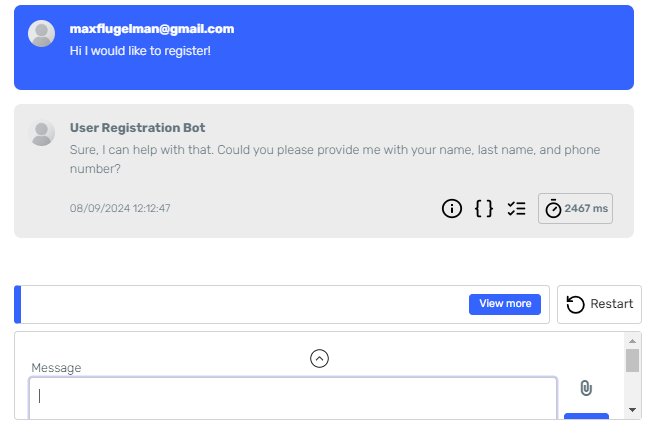
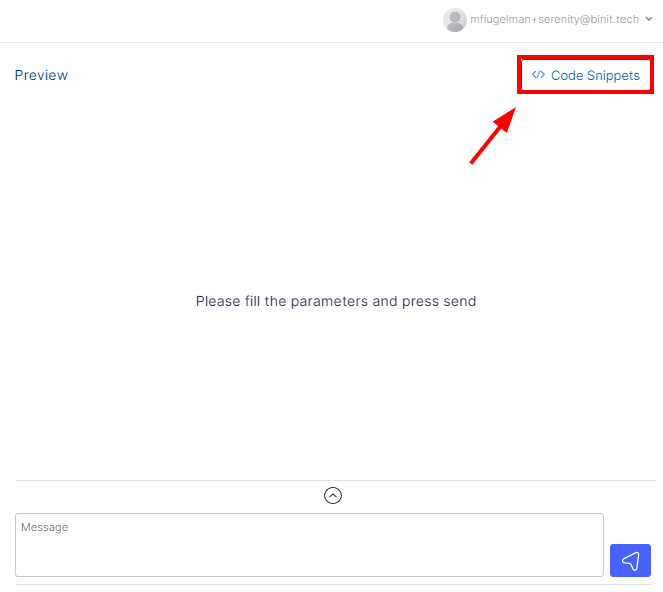
At the right side we have a "Preview" section where we can test our agent filling-in the prompt parameter with different values.

Let's try it.

First test asking to schedule a meeting

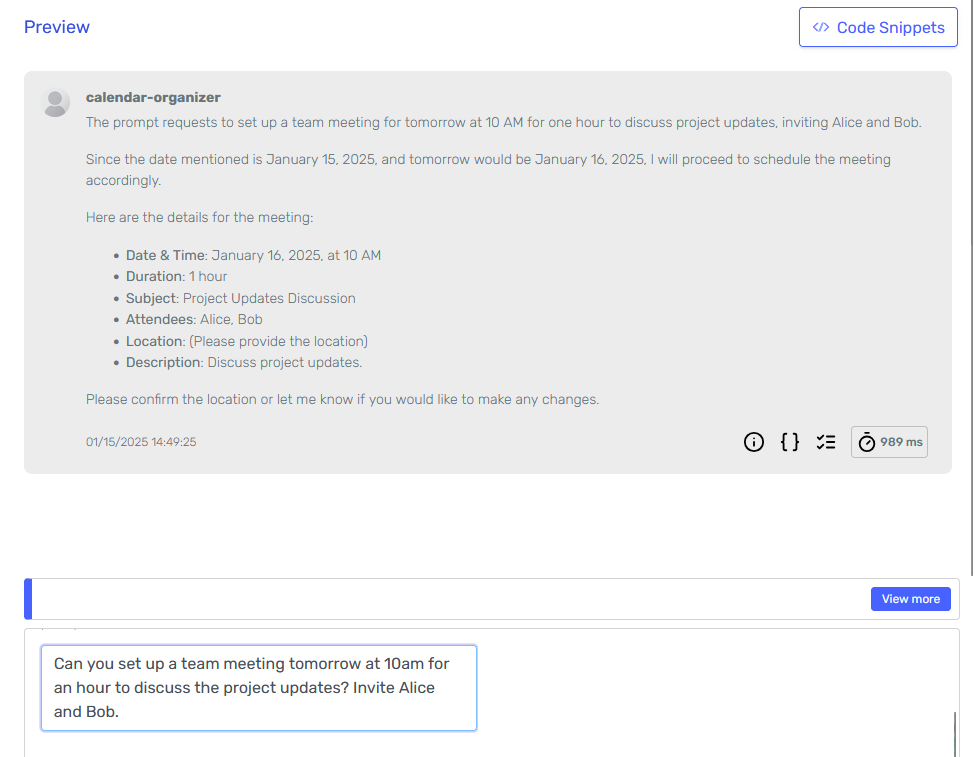
It seems like it understood the task, but taking a look at the logs I can see that it didn't invoke any of the skills and its asking for the location of the meeting. That's probably because I didn't specify which fields are optional when describing the body.

It also appears to be using the date I provided as an example (2025-01-15) as the current date.

Let's try adjusting the input prompt to see if we can get a better result:

The response of the agent demonstrating that the meeting was successfully created

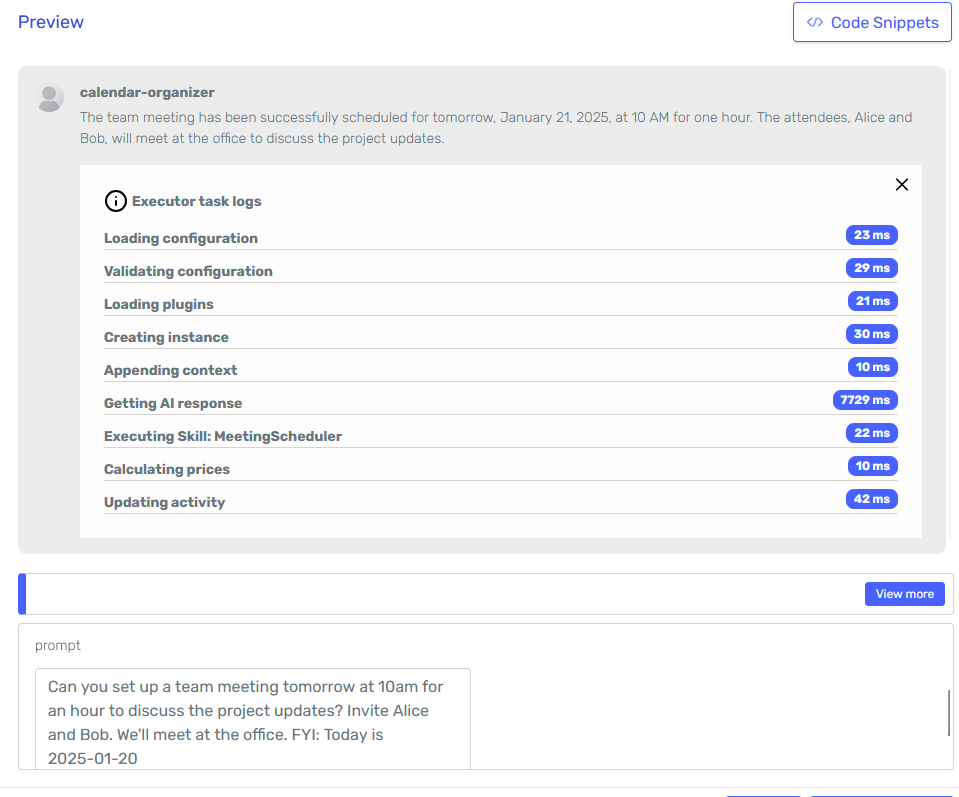
It seems the adjustments to the prompt did the trick, and now the agent is properly calling the MeetingScheduler skill.

Automated testing

One or two manual tests are not enough to ensure the agent is working as expected. Ideally, we should run a set of diverse tests that emulate real-world scenarios and evaluate the results to see where the agent is failing.

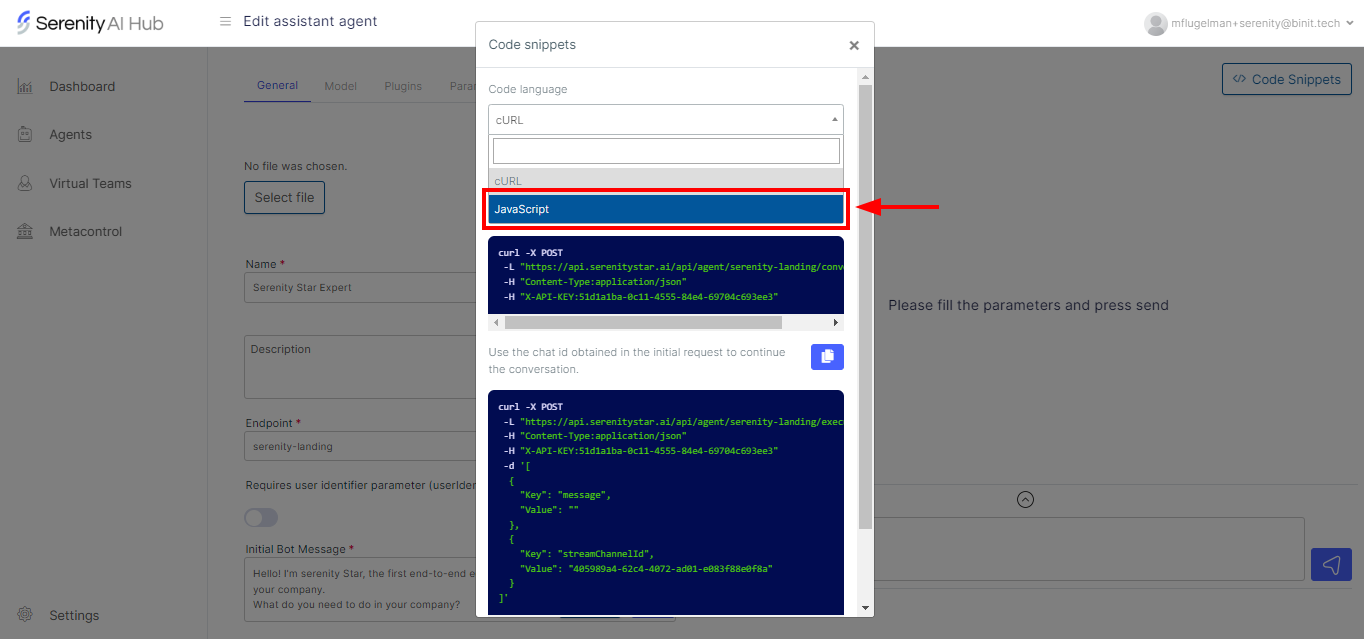
You can use Postman to run automated tests on your agent by providing a data file with many different test cases and using Postman's scripts to verify the results.

Postman endpoint and body

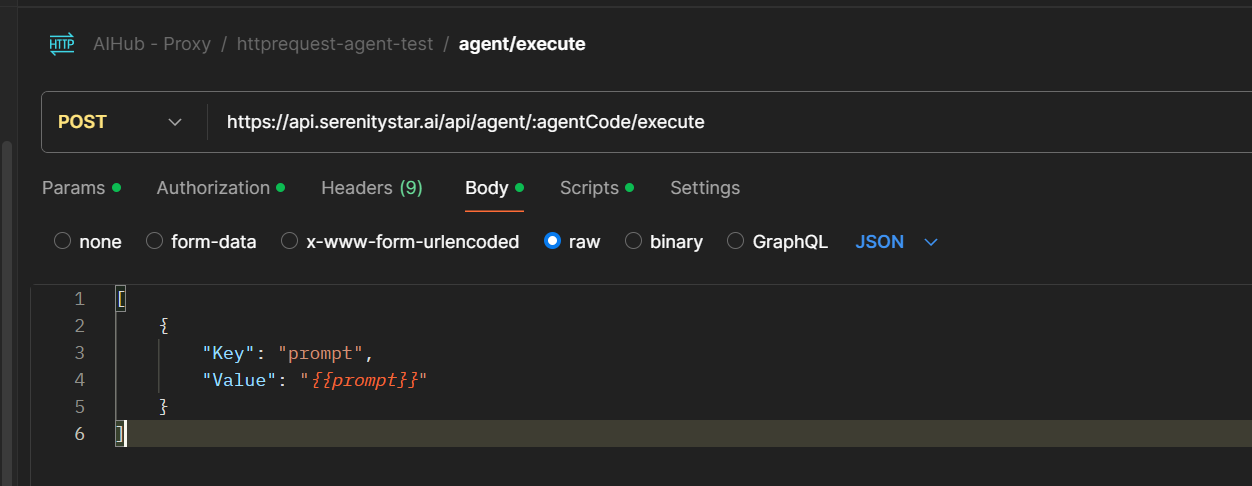
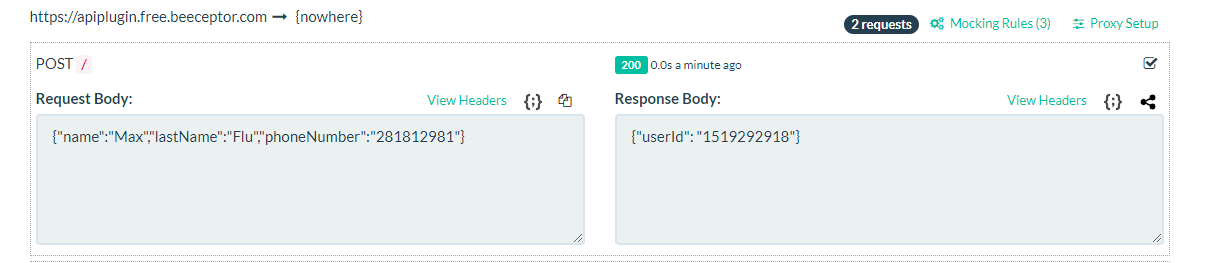
For example, in this case, I added a Postman endpoint where the body contains a variable for prompt, which will be replaced by the test data.

Here's a sample of my test data:

[
{
    "prompt": "Arrange a meeting for the product demo on September 22nd at 3 pm. It should take 45 minutes.",
    "type": "meeting"
},
{
    "prompt": "Put the Leonid meteor shower on November 17th on my calendar. Starts at midnight.",
    "type": "event"
},
{
    "prompt": "Book a weekly sync with the design team next Thursday at 11 am for 30 minutes.",
    "type": "meeting"
},
{
    "prompt": "Add the company picnic to my calendar for August 25th. It starts at 10 am and lasts all day.",
    "type": "event"
}
]

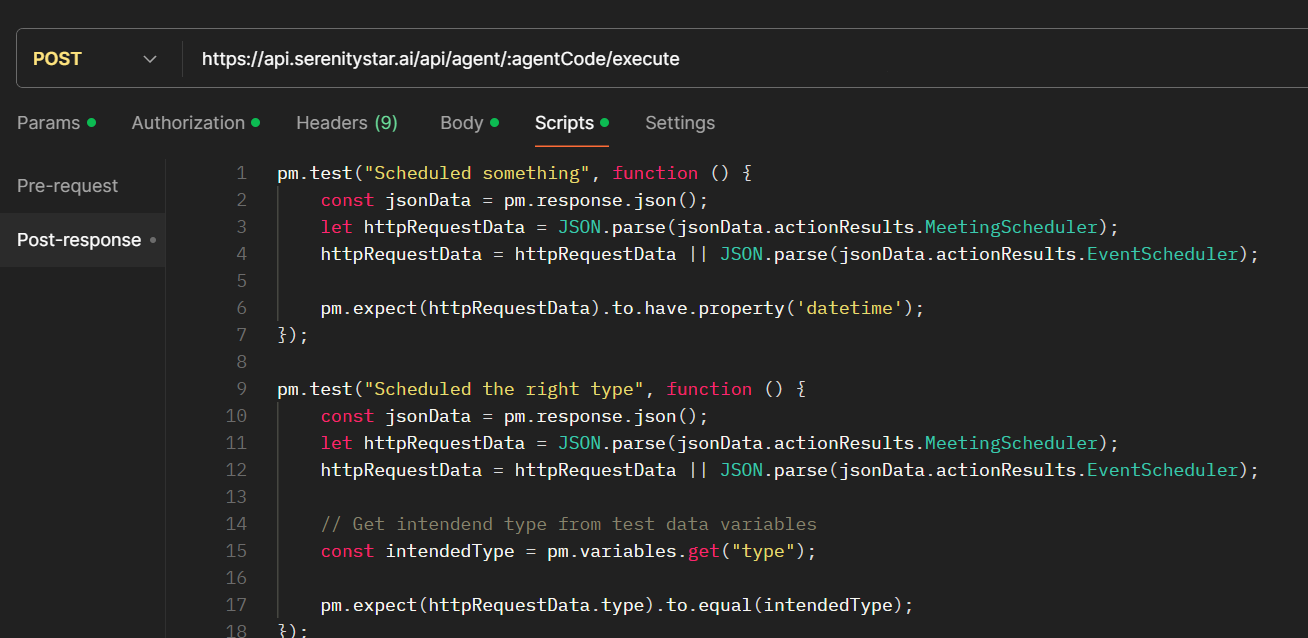
I also added a test script to verify the agent's response. This script checks if the agent used the right skill by comparing the response with the variable type. This variable is part of my test data, but it's not sent to the agent since we only use it to verify the response.

Postman scripts for testing

I'll configure a Runner to execute this endpoint using my json file as the data source.

Postman runner configuration

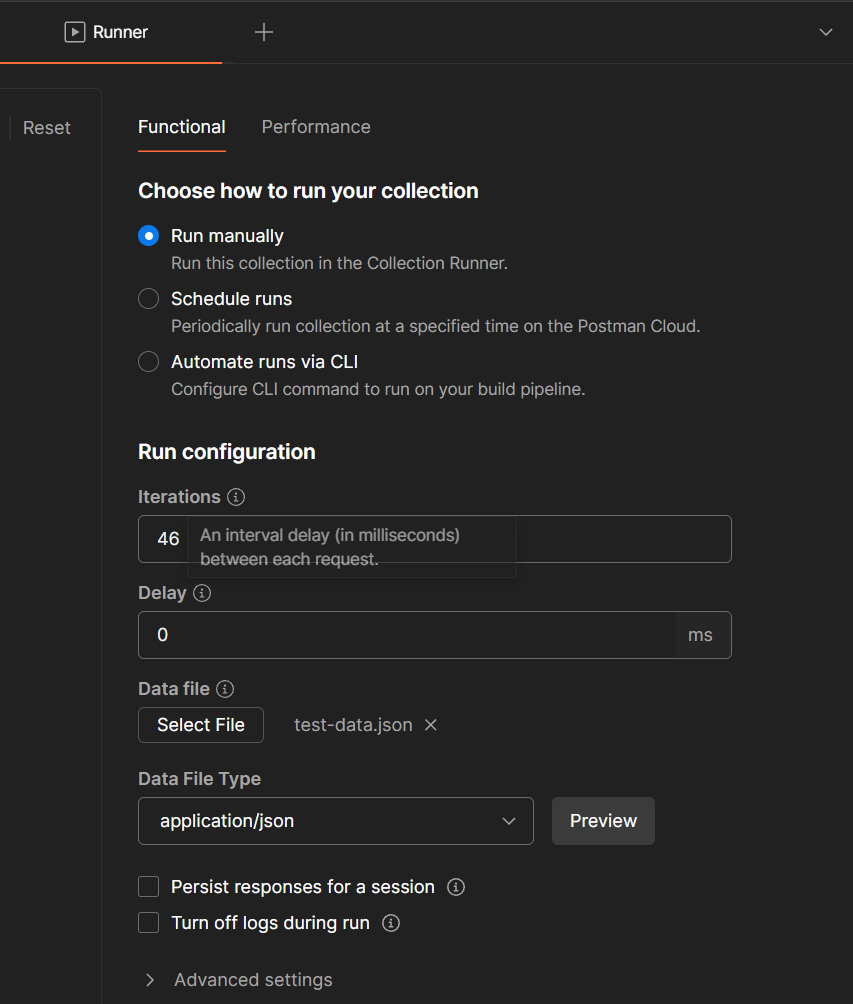
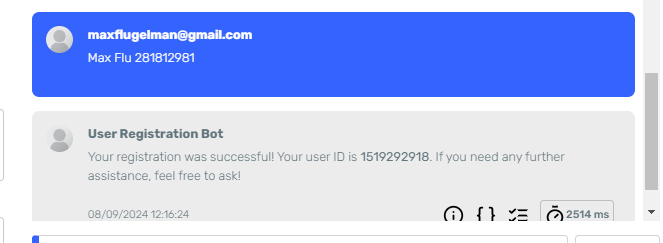
And after running the tests, we can see the results:

Postman tests results

According to the results, sometimes the agent uses the wrong skill, and sometimes, it cannot use any skill at all.

After reviewing the failed tests, I noticed 3 main issues:

  1. The agent sometimes confuses Meetings with Events, which makes sense since we didn't provide any information on how to differentiate them.
  2. It has trouble calculating dates with prompts such as "Tomorrow" or "Next Wednesday" unless we provide the current date, time, and day of the week within the prompt.
  3. It also can't differentiate between optional and required body fields, and it doesn't know details about them, such as the unit of time for the duration field.

Improving the agent

Issue 1: Differentiating between Meetings and Events

This should be easy to fix. We need to change the skill's description to provide more information.

Meeting skill improved description

Event skill improved description

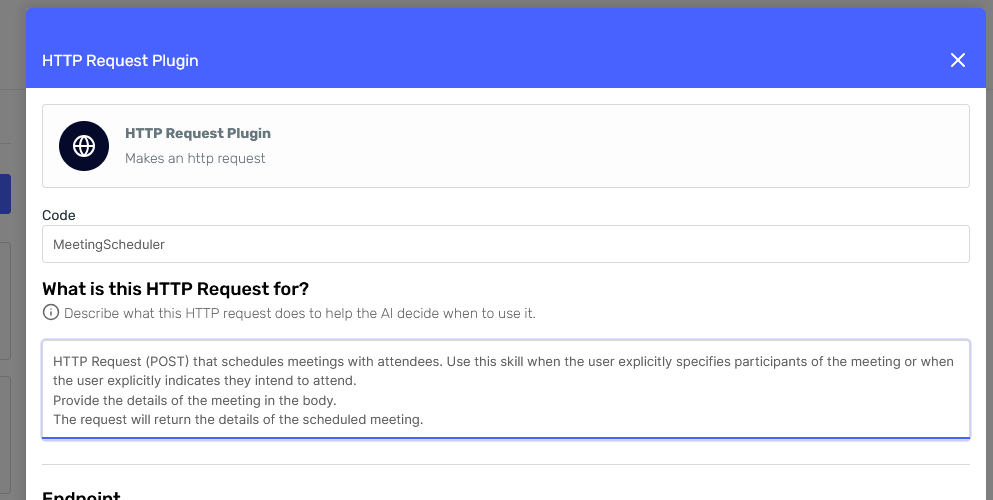
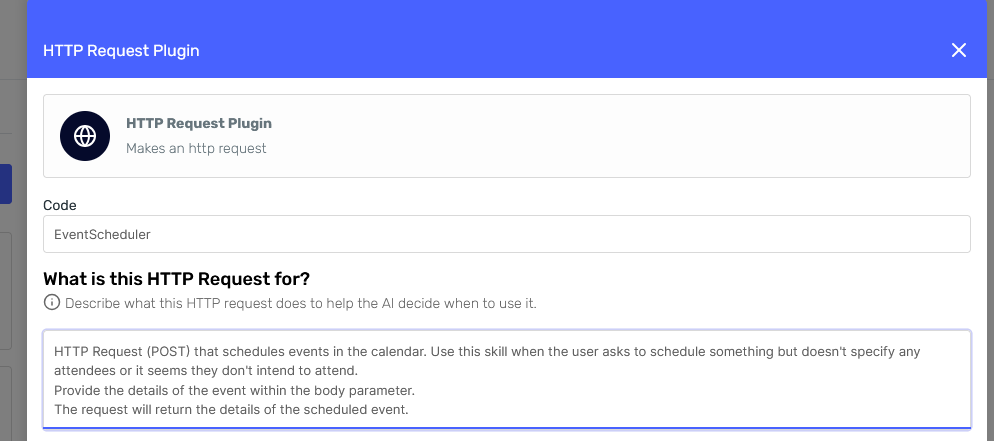
The improvements are:

  • Now we're indicating when to use this skill.
  • We're specifying the skill is actually an HTTP request, so it's easier for the agent to understand why it needs a body. And we're also stating that a body must be provided to strengthen that point.
  • Finally, we're indicating the skill's expected output.

Issue 2: Calculating dates

We could fix this by adding the "TimePlugin," which includes a set of tools to calculate dates and times and returns the current date. But in this case, there's a simpler solution.

We can use Liquid to indicate the current date in the "Ask" field, like so:

Using liquid to specify the date

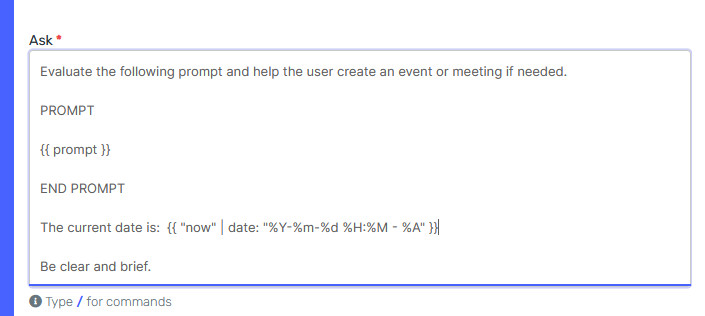
The liquid expression prints the date in the following format "2025-01-15 15:10 - Wednesday". Read more about this here

💡 Including just the minimum required skills is a good idea for performance and to avoid confusing the agent.

Issue 3: Building a valid body

This can be done by improving the body description, like so:

Improved body for the meeting skill

We're now providing a description for each field, indicating when they're required or optional, and details about the data type and units.

Testing the improved agent

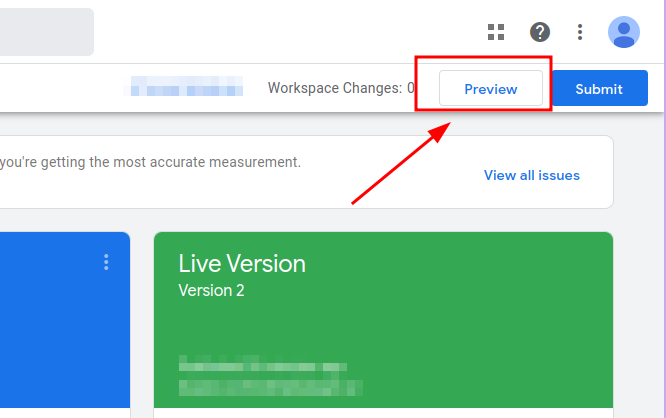
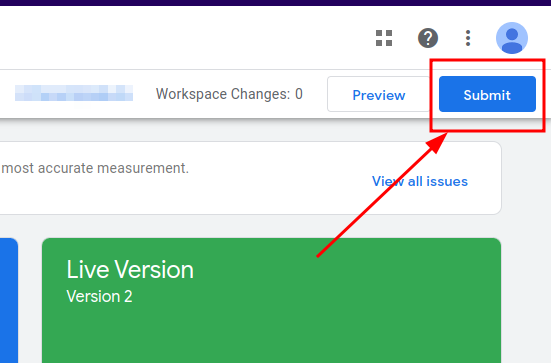
We can run the tests again after saving and publishing the agent with these changes.

Postman results after improving the agent

The results look much better now. However, we can keep iterating and testing by following the same process.

Final tips on configuring agents with skills

To sum up, here are some tips to get the best results while configuring an agent with skills:

Choose a clear representative Code for your skill: This, along with the description, will help the agent determine when to use it and will also help you find it in the agent's response and logs.

  • Write detailed descriptions: The Skill description is key to instructing the agent when and how to use it. Write anything you think is relevant, including constraints, what the endpoint will return, and when not to use it.
  • Describe the body (or any other skill parameters) thoroughly: If the agent needs to create a body for your request, make sure it knows the details of each field, such as data types, which are required and which are optional, types of units, etc.
  • Include the minimum skills needed to do the job: This will help the agent avoid confusion and improve performance. If you think your agent is overloaded with skills, you may want to replace some with Liquid or use the Agent executor skill to call specialized agents for each task.
  • Try different models: If the model you selected for your agent is not performing as expected, try a different one. Read the documentation on each model to see which one may perform better for your use case.
  • Test thoroughly: Make sure the agent performs well on different cases. Users may provide diverse prompts, and we don't want to overfit the agent to a specific type of input.
  • Iterate: Keep iterating. We can always return to a previous version of the agent, so don't be afraid to make changes and test them.

How to Integrate the Chat Widget in a Next.js Project

· 3 min read
Mauro Garcia
Front End Engineer

The Chat Widget allows you to add a customizable AI-powered chat feature to your web application. This guide will walk you through integrating the widget into a Next.js project using both the App Router and Pages Router approaches.

Using App Router

When using the App Router in Next.js, follow these steps:

Step 1: Modify the Root Layout

In the app/layout.tsx file (or .js), add the CSS link to the <head> section and the JS script to the end of the <body>. You'll also need to include a placeholder <div> for the chat widget and reference a custom component for initialization.

Here’s an example of the modified layout:

import type { Metadata } from "next";
import { Geist, Geist_Mono } from "next/font/google";
import "./globals.css";
import SerenityChat from "@/components/SerenityChat";

const geistSans = Geist({
variable: "--font-geist-sans",
subsets: ["latin"],
});

const geistMono = Geist_Mono({
variable: "--font-geist-mono",
subsets: ["latin"],
});

export const metadata: Metadata = {
title: "Create Next App",
description: "Generated by create next app",
};

export default function RootLayout({
children,
}: Readonly<{
children: React.ReactNode;
}>) {
return (
<html lang="en">
<head>
{/* Add Serenity* Star Chat CSS */}
<link
key={"serenity-chat-styles"}
rel="stylesheet"
href="https://hub.serenitystar.ai/resources/chat.css"
/>
</head>
<body className={`${geistSans.variable} ${geistMono.variable}`}>
{/* Placeholder for Chat Widget */}
<div id="aihub-chat"></div>
{children}
{/* Initialize Serenity Chat */}
<SerenityChat />
{/* Add Serenity* Star Chat JS */}
<script src="https://hub.serenitystar.ai/resources/chat.js"></script>
</body>
</html>
);
}

Step 2: Create the Chat Widget

The Chat Widget initializes the chat using the AIHubChat class. Place this file in src/components/SerenityChat.tsx:

"use client";

import { useEffect } from "react";

const SerenityChat: React.FC = () => {
const initChat = () => {
//@ts-ignore
const chat = new AIHubChat("aihub-chat", {
apiKey: "<Your API Key>",
agentCode: "<Your Agent Code>",
baseURL: "https://api.serenitystar.ai/api",
});
chat.init();
};

useEffect(() => {
initChat();
}, []);

return null;
};

export default SerenityChat;

Replace <Your API Key> and <Your Agent Code> with your actual credentials.

Using Pages Router

If you’re using the Pages Router, you just need to update your _app.tsx file.

Include the CSS link and the initialization script globally. Use the <Head> component for the CSS and also add the js script like this:

import Head from "next/head";
import { useEffect } from "react";
import "@/styles/globals.css";

export default function App({ Component, pageProps }) {
useEffect(() => {
if (typeof window !== "undefined") {
//@ts-ignore
const chat = new AIHubChat("aihub-chat", {
apiKey: "<Your API Key>",
agentCode: "<Your Agent Code>",
baseURL: "https://api.serenitystar.ai/api",
});
chat.init();
}
}, []);

return (
<>
<Head>
{/* Add Serenity* Star Chat CSS */}
<link
rel="stylesheet"
href="https://hub.serenitystar.ai/resources/chat.css"
/>
</Head>
<div id="aihub-chat"></div>
<Component {...pageProps} />
{/* Add Serenity* Star Chat JS */}
<script src="https://hub.serenitystar.ai/resources/chat.js"></script>
</>
);
}

Summary

  • App Router: Use layout.tsx for global styles and scripts and a use client component for chat initialization.
  • Pages Router: Add the CSS and JS in _app.js, and initialize the chat directly in a useEffect.

By following these instructions, you can easily integrate the chat widget into your Next.js project.

Google Tag Manager Integration

· 4 min read
Mauro Garcia
Front End Engineer

Integrating the Chat Widget into your website using Google Tag Manager (GTM) is straightforward and allows you to add the chat widget without modifying your website's code directly. This guide will walk you through the simple steps to set up GTM if it's not already installed, and then show you how to add and configure the Serenity Chat custom tag.

Step 1: Add Google Tag Manager to Your Website

Before adding the Serenity Chat tag, you need to ensure GTM is installed on your website. Here’s a quick setup guide if you haven’t done this yet:

  1. Create a GTM Account:

    • Visit the Google Tag Manager website and sign in.
    • Create a new GTM account by providing your account name and container details.
  2. Get the GTM Script Snippet:

    • After setting up your container, GTM will provide you with a JavaScript snippet.
    • You’ll need to paste this into your website: one part goes in the <head> section, and the other immediately after the opening <body> tag.
  3. Install the Snippet on Your Website:

    • Add the GTM snippet to the appropriate sections of your website’s HTML, ensuring it's included on all the pages where you want to use GTM.

      Google Tag Manager - Code Snippets

Once the GTM code is in place, you’re ready to start adding tags.

Step 2: Add the Serenity Chat Custom Tag

Now that GTM is installed, you can add the Serenity Chat tag to integrate the chat tool into your site. Follow these steps to configure it:

  1. Open Your GTM Workspace:

    • In Google Tag Manager, open the Workspace you want to use.
  2. Create a New Tag:

    • Go to the Tags section and click on New to create a new tag. Add Tag
    • In the Tag Configuration box, click to open the Choose Tag Type panel.
  3. Discover the Serenity Chat Template:

    • In the panel, click on the option Discover more tag types in the Community Template Gallery. Add Tag

    • This will open the Community Template Gallery. Use the search bar to filter for "Serenity Chat". Add Tag

    • Once you find the Serenity Chat tag, click on Choose Template. Add Tag

  4. Configure the Serenity Chat Tag:

    • After selecting the template, you’ll see the configuration fields.
    • Enter your API Key and agentCode in the required fields. Add Tag
  5. Set Up a Trigger:

    • Scroll down to the Triggering section and click Triggering.
    • For most users, it’s recommended to select Page View and apply it to All Pages. This ensures that the chat will appear on every page of your site. Add Tag
  6. Save the Tag:

    • After configuring the tag and trigger, give your tag a descriptive name (e.g., "Serenity Chat Tag") and click Save.

Step 3: Publish Your Changes

After you’ve configured and saved the Serenity Chat tag, you need to publish your changes for them to take effect:

  1. Preview Your Changes:

    • Before publishing, click Preview in GTM to test the tag. This will open a debug mode where you can verify that the Serenity Chat widget is working as expected on your site. Add Tag
  2. Submit and Publish:

    • Once you’ve confirmed that everything works, click the Submit button. Add Tag
    • Add a description of your changes (e.g., "Added Serenity Chat tag").
    • Finally, click Publish to push the changes live to your website.

Conclusion

By following these steps, you can easily integrate Chat Widget into your website using Google Tag Manager. This allows you to deploy the chat functionality quickly and manage it through GTM without editing your site’s code directly. Once live, your chat widget will be available for users to interact with.

For any issues or additional customizations, be sure to consult the GTM or Serenity Chat documentation.

How to integrate Assistants with external APIs

· 5 min read
Máximo Flugelman
Máximo Flugelman
Project Manager

With Serenity* Star AI Hub, you can add plugins to an Agent so you can send HTTP Requests to an external API. This can be useful if you want to collect user information using the Chat Widget

Let's implement a simple agent that will do the following:

  • Ask the user for they Name, Last Name and Phone Number
  • Once all data is provided, an HTTP POST request will be sent to an external API that will register the user and return a User ID.
  • Inform the user that their registration was successful and return the User ID.

Prerequisites

You should have an API endpoint that allows for sending data using the following format in the body:

{
"name": "",
"lastName":"",
"phoneNumber:
}

And its response has the following structure:

{
"userId": ""
}

Creating an Assistant Agent to chat with the user.

First, create our Assistant Agent that will chat with the user. An Assistant, is a type of agent that allows you to interact with the user without having to deal with the complexity of the conversation flow. You just send the user's input to the agent, and it will return the response taking into account the context of the conversation.

If you want to learn more about assistant agents, checkout Assistant Agent

  1. Navigate to the Serenity* platform.
  2. On the Sidebar, go to agents and on this menu, select "New agent" at the top right. You will be taken Serena creation chat, we will skip this step, press on "Create Manually" and select "Assistant Agent" Access to agent grid Select create manually Select assistant agent

The form will have several tabs, General, Model, Skills, Parameters, Knowledge, Behaviour.

General Tab

In the General tab, fill the form with the following fields:

  • Name: A descriptive name of the agent, in this case, we will use User Registration Bot
  • Code: A unique code to identify the agent, we will use registration-bot
  • Description: A short description of what the agent does, in this case, we will use This agent will gather user information and store it in an external API
  • Avatar (Optional): You can upload an image that will represent the agent.

Behaviour tab

  • Initial Bot Message: This is the first message that the agent will send to the user. In this case, we will use Hello! I'm here to help you register in our platform. Please provide me with your Name, Last Name and Phone Number.

  • Personality: Here we have to tell the agent what we want to do. In this case, we want to gather users information, we will be using the advanced mode. Open the advanced mode and set the following prompt

    Your goal is to register users in our platform, for this you have to retrieve and store user data.
    The data you must retrive is:

    - Name
    - Last Name
    - Phone Number

    Prompt the user to gather this information.
    Once you have all the information. You must store the user data through an httpp request with the following body format:

    {
    "name": "",
    "lastName":"",
    "phoneNumber:
    }

    If the storage is correct, you should return the userId you have received. If its incorrect, reply "It's not posible to store the information right now"

    Extended view of agents personality

Skills Tab

  1. Click on "Add Skills" Add skills option

  2. Add the Http Request Plugin: alt text

Configuring the Plugin

Fill out the form for the API configurations on the side panel wizard. Set up the authorization of your API, and complete de required fields.

In this example we will be using a mock server with no authorization so we only need to fill out the description and URI.

Description: This field should contain a description of what the endpoint does or the goal of the http request as the AI will use it to decide wether or not to make the call.

Body: As the body will be filled by the agent, we can leave it empty

URI: The endpoint of the request we will be using

Finally our Http Request Plugin looks something like this Configuration of the http request plugin Configuration of the http request plugin

Testing the Assistant

Finish by clicking on the "Create" button. You will be redirected to the agent's list.

Search for the agent an open it.

At this point, the assistant is ready, so let's try it out by writing on the preview window.

Asking the agent to register Agents response and succesfull registration

We can additionaly take a look at the mock server to make sure the request was succesfully received.

alt text

Great! It seems like the Agent has successfully sent the gathered data to the API and received a response.

Wrapping it up

  • Agents can make API calls by including the HTTP Request Skill
  • The plugin description should be comprehensive so that the agents can identify when to call it, specially when more than one call is configured.
  • The agent can retrieve an create a body from the conversation with the user
  • For better results, use Open AI Models when using this skills.
  • Http Request can manage various types of authorization depending on the endpoint requirements

How to incorporate the chat widget in Wordpress

· 3 min read
Uriel Volman
Uriel Volman
FullStack Engineer

The Chat Widget module allows you to quickly integrate your agents into your site.

This module is designed to be as simple as possible to integrate, and it provides a simple API to customize it to your needs.

This article will guide you through the process of adding the Chat Widget module to a Wordpress site.

If you want to learn more about this module, checkout the Chat Widget module.

Getting code snippets for my agent

To add a new instance of the chat widget, you'll need to add the following resources to your HTML file:

  • Link to the Chat Widget CSS & JS files
  • Empty HTML element that will be replaced by the widget
  • Component initialization script
  1. Go to Serenity* AI Hub and select the agent type you want to use.

    image

  2. Inside the list of agents, filter by the name of the agent you want to use and press the edit button.

    image

  3. Once in the Agent Designer screen, click on the "Code Snippets" button in the top right corner.

    image

  4. Once in the code snippets you will find a selector where you can choose between different options.

    image

  5. Select JavaScript code language.

    image

  6. Copy the fragments provided.

    image

Installing the required Wordpress plugins

Once we got the code snippets, we'll need to visit our WordPress dashboard. image

  1. In the wordpress dashboard, we will go to plugins. image

  2. Before incorporating the chat, we must verify that we have installed the plugin "Simple Custom CSS and JS".

    image

  3. In case you do not have the plugin, click the "Add new plugin" button in the sidebar.

    image

  4. Type "Simple Custom CSS and JS" in the search box.

    image

  5. Press "Install Now" and then "Activate".

    image

  6. After activation the "Custom CSS & JS" option will appear in the sidebar.

    image

Adding code snippets to Wordpress

With the plugin activated, it's now time to add the code snippets for the chat widget. Once we're done, the chat will be displayed in the bottom right corner of the screen.

image

To add the snippets we must go to the "Custom CSS & JS" option in the Wordpress sidebar, and then use the "Add HTML Code" and "Add JS Code" buttons. image

Adding CSS & HTML snippets

  1. Go to "Custom CSS & JS", and then click on "Add HTML Code"

  2. Give it a title and paste in the code box the snippets specified below

    <!-- Empty div to replace with the chat -->
    <div id="aihub-chat"></div>

    <!-- Chat widget resources -->
    <script src="https://hub.serenitystar.ai/resources/chat.js"></script>
    <link
    rel="stylesheet"
    href="https://hub.serenitystar.ai/resources/chat.css"
    />
  3. Publish the code image

Adding the JS code

  1. Go to "Custom CSS & JS", and then click on "Add JS Code".

  2. Give it a title and paste in the code box the snippets specified below

    document.addEventListener("DOMContentLoaded", function () {
    const chat = new AIHubChat("aihub-chat", {
    apiKey: "<Your API key>",
    agentCode: "<Your Agent Code>",
    baseURL: "https://api.serenitystar.ai/api",
    }
    chat.init();
    );
  3. Publish the code image

Once these changes have been made, the chat widget should be displayed on the Wordpress site. image

Conclusion

In this article, we've learned how to add the Chat Widget module to a Wordpress site. This module allows you to quickly integrate your agents into your site, and it provides a simple API to customize it to your needs.

If you want to learn more about this module, checkout the Chat Widget module

Welcome

· One min read
Mauro Garcia
Front End Engineer

Welcome to Serenity AI Hub Blog! This is the place where we share news, updates, and insights about our products, features, and more.

Stay tuned for the latest information and announcements. We're excited to have you here! 🚀